How to Treat Tree Branches for Indoor Use
Today I’m teaching you how to treat tree branches for indoor use. Learn how to clean and remove bark, as well as how to finish branches for decor and crafts.
How to treat tree branches for indoor use
Today we’re talking about how to finish branches for indoor use. And you can consider this article an appetizer for an article I have coming up later this week on how to make a cat tree out of a real tree!
I was starting to put together the cat tree details when I realized that it was going to be a really long article. So I decided to break out the part about how to treat tree branches for indoor use, specifically how to clean, strip, and finish the branches, and make it its own piece. And that’s this!
Using tree parts for home decor is beautiful, cost effective, and not too hard. Check out my tutorial for my DIY tree stump side table for a related project.
There are many ways to finish branches for decor. You can consider the steps I outline below to be only one approach. I’ll provide some additional tidbits on other approaches I didn’t use along the way. 🙂


Here’s what I used…
(Affiliate links below; read more about those here)
- Branches and a dry space
- A paint scraper—like this one here.
- Small hand-held saw—see one here—and a miter saw (not completely necessary, but we needed to trim some thick branches down).
- Assorted sandpaper—I used 100 and 150 grit depending on the spot.
- Minwax Stain in Natural and Rust-Oleum Ultimate Polyurethane in Satin.
And here are the steps to clean branches for decoration!
(Remember to wear a mask and eye protection while sanding and working with wood, and wear an appropriate mask while working with paints, stains, and finishes. Follow the directions and warnings from your particular brand. Do not use any tools without proper training, precautions, and supervision from a professional. Read my full terms of use here.)
Step 1: Find a suitable branch
We foraged the woods behind my parents’ house and found two great branches that were already on the ground. I thought it would be best to find something that had already been drying out on the ground because I didn’t want to butcher a tree.
We also knew that the drying process would take a while. Not knowing how long our branch had been detached from its tree was a risk we were willing to take. 🙂
After cutting the branches, we brought them into my dad’s workshop, which has baseboard heating, to dry out for 2 more months. We guessed the pieces we had were pretty dry since they did have some cracking, but we wanted to be sure. If we’d thought they were newer branches, we would have let them dry for longer.

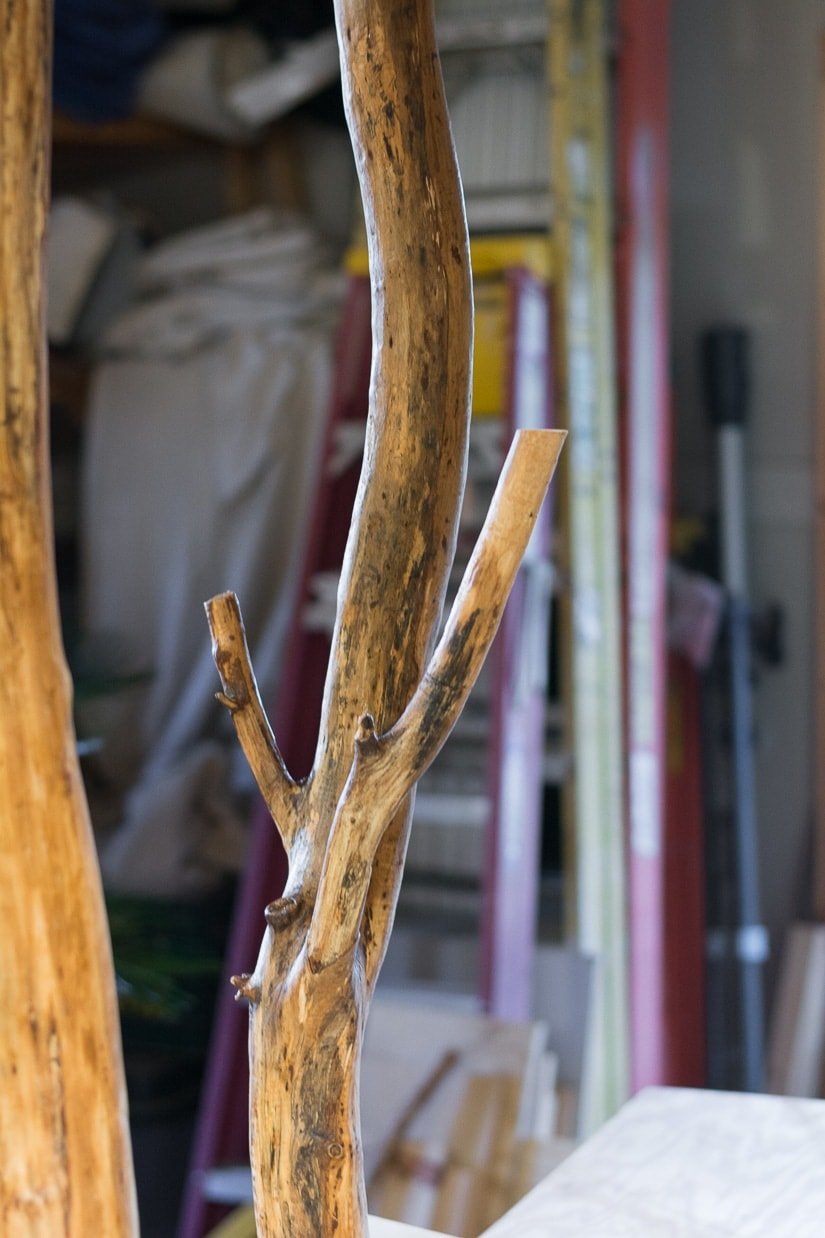
Step 2: Remove bark from branches
After about 2 months, I started scraping the bark off. This is a very important step that a lot of people skip when bringing tree parts indoors. You need to scrap the bark off because there could be bugs living under it!
In fact, I found guide a few little guys while I was scraping. Bugs have a purpose, but I don’t want them living in my home 🙂 The bark will eventually fall off anyway, so it’s best to take it off at the start of your project.
There are lots of ways to de-bark trees. The ease with which you can remove bark depends on many factors, including what type of tree it is, how dry the wood is, and even what time of year it is. So it’s hard to provide an estimate.
Unfortunately for me, my bark was not easy to remove—and it looks like that’s the case for many people if my Googling is any indication. But don’t worry, the results are totally worth the time and frustration!
I read that a lot of people use a draw knife and even a pressure washer to remove bark, but I used a paint scraper. It worked really well! It just took time and elbow grease, and it was extremely messy.


Step 3: Sand and polish the branches
After I’d scraped all of the bark off, I cried of happiness that the miserable process was over and grabbed some sandpaper. I used 100-grit sandpaper on some of the rougher spots.
Then I gave the entire piece a good, thorough sand with 150-grit sandpaper. I was truly amazed at how well sanding polished the piece. I did all sanding by hand since the branch was a bit curvy and bumpy—just seemed easier.

Step 4: Stain the branches
After cleaning off my work space and wiping down the branch with a dry paper towel, I used a chip brush to apply a generous coat of stain. Minwax Stain in Natural really helped to bring out the wood’s character.
I didn’t even wipe off the excess stain—I just left it to soak into the wood for about 24 hours. Like I said, my pieces were pretty dry, so the stain soaked right in. (I also have a whole article about how to stain and finish wood if you’re new to the process!)


Step 5: Finish to protect
At this point I was giddy with excitement about how good the branches looked. I finished them off with two coats of Rust-Oleum Ultimate Polyurethane in Satin because I wanted to bring in a bit of sheen while providing further protection for the branches.
This is a water-based polyurethane that dries much faster than an oil-based one. I also really love Varathane water-based polyurethane in matte. I used it on my daughter’s dollhouse bookshelf, our cat house side table build, and our DIY plywood planter because I didn’t want much shine on any of these pieces. You can see it’s a beautiful, understated finish.


And here are my treated branches finished…
You can see that the pieces have just the right amount of sheen for what I wanted. I wanted them to look polished but not super shiny and fake, and I think the water-based poly in satin really achieved that look.
They do look a but shinier in person—this was hard to capture in photos. If you want them to look like these pictures, I’d err on the side of caution and go with a matte water-based formula. You can always add a layer of satin on top of the matte if you don’t love it.


In conclusion…
Although I made these for a cat tree, I later repeated the steps I outlined in this tutorial to make a DIY Tree Branch Plant Hanger. So tree branches are a really versatile material to use for decor. Good luck!
Pin my tips about how to treat branches for indoor use!


What a great idea! Do you have any suggestions for how these branches could be used in home decor?
Thanks, Pamela! They might be nice on a fireplace mantle! I’ve also thought about a coat rack. 🙂
I will be doing this to hang my running medals. Most medal hangers are expensive and ugly (a thin piece of metal with some hooks or something along those lines).
I would just need to drill a hole about 1 or 2 inches from the end so I can mount it on the wall and then get the small hooks that come in picture hanging packets so I can hand the medals without covering the wood
That is a great idea Anne!
My name is tammie I have a small country home with 5 acres in Henderson tx, I love wood anything, my home has a lot of nottie pine not real I’m sure but beautiful none the less , I am going to retire in 1 year and want so badly to work with wood and make beautiful things for my home, I have a lot of pine trees and others on my property, but do not have a clue as to where to start, cant find any wood working classes in my area. My husband is diabled and I would love to do this with him to create wood beautiful pieces for our home and family, any ideas so greatly needed, thanks so very much
I think I will try this and make a small table with caster and put my Golden Pothos on. So it will have a natural wood to climb up! Thanks for the great idea! ?
That’s a great idea Terry!
I’m concerned about my cat scratching the treated wood. Would it be harmful? Chemicals and my cat make me a little nervous.
It’s no different than any piece of furniture in your home, and these days, many furniture pieces are made of more harmful substances than natural wood and a water-based finished anyways 🙂
I am wanting to start a tree limb project. How do you decide on a branch? By that i mean the quality. Likei s it to rotten benn down to long etc. Im really struggling with hat aspect of picking one
and clearly I cant type words correctly like is it too rotten, been on the ground to long etc
Hi, Have you ever soaked your wood first in bleach water to rid of any pests?
Do you know how long the bark will last if not removed?
Thanks,
Sue
HI there! I just thought i’d mention that I collected some branches from the park yesterday and it’s been snowing here in Manchester, England. The branches were very damp and kind of yucky so the bark came off incredibly easily! I pulled most of it off with my fingers and used a butter knife on the knobbly bits. Took an hour to strip approx. 20 arm length branches. They’re now drying. Hope this is somewhat useful to somebody!
Kish x
I’m in Manchester (England) too and just read this! Great tip- horrible rainy weather we have now will actually be useful for something ? x
This is exactly what I was looking for. I tried to find other guides on the net but nothing comes close in detail than this. It will for the moment be by goto approach until I see the results for myself. Many thanks for sharing this post.
What would you recommend fora darker finish? and could you not just sand off the bark?
Any darker stain would do! As for the bark removal method, for this project (which I also did a darker stain on), I was able to remove the bark by hand and then sand off the rest: https://www.bybrittanygoldwyn.com/tree-branch-hanger/
I’m no pro on peeling bark off of limbs but my dad was. And he always did it before the wood dries out. Now this could have only apply to the wood he used. I don’t know what kind it is and I can’t ask him. Maybe try to next time ??♀️ I’m going to use his trees to make a cat tree!
I totally agree that it would have been smarter to do this before the wood dried out!! I stripped and finished some branches for some plant hangers years after this project and stripped the bark before the branches dried. I will say it probably also depends a lot on the type of tree you’re working with, too.
I have some birch branches. I don’t want to remove the bark. They are dirty. What would you suggest for cleaning them?
Hi! Honestly, I would remove the bark because it will probably come off eventually. If you want to try to keep it, you can try washing the branches off outside using a mild dish detergent. Good luck!
how do you know when the wood is dry enough?
I made an educated guess! Haha. When cracks started to appear, I felt like it was sufficiently dry.