
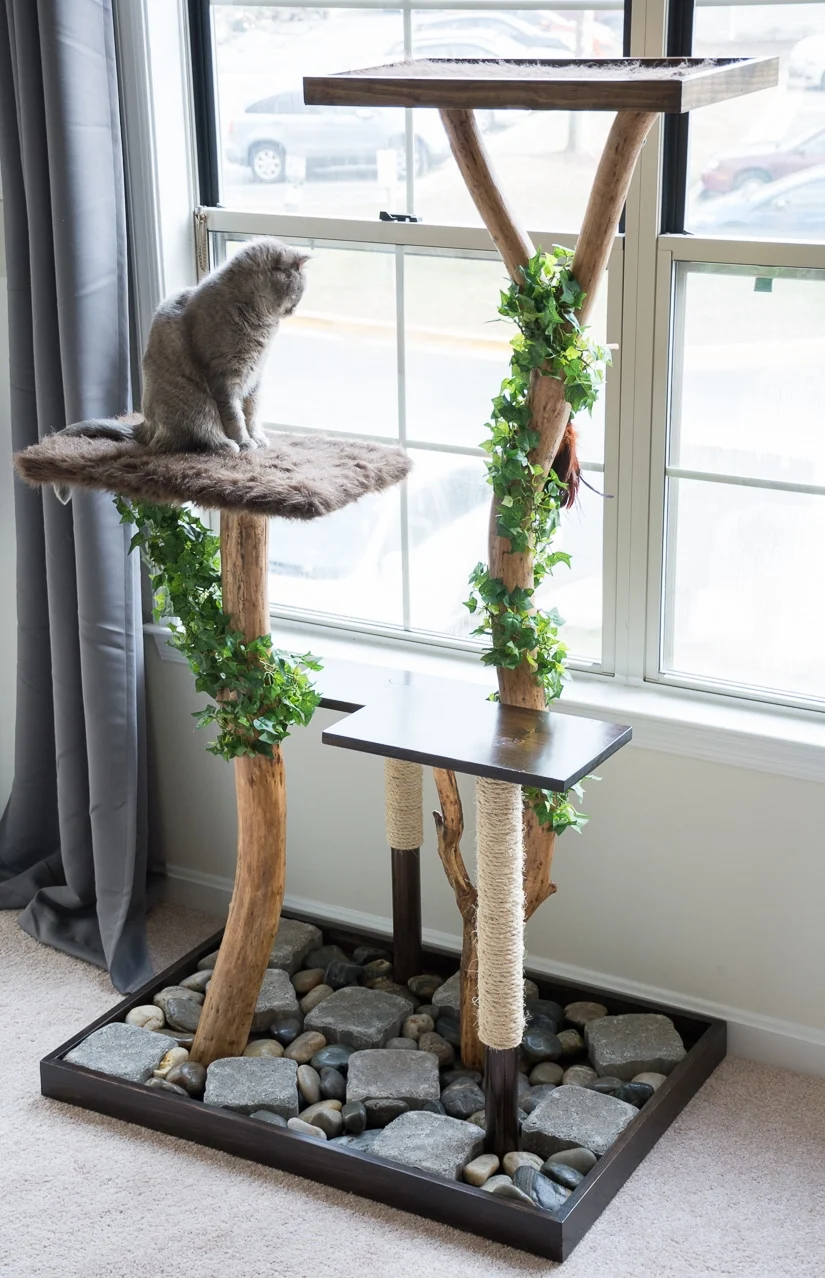
DIY Tree Branch DIY Cat Tree
I have wanted to make a cat tree with real branches for a long time. It’s one of those projects that’s been bubbling up on my dream project wish list for a while. I am ecstatic with the finished tree!
This is a long post, so bear with me. I will walk you through the entire process beginning with finding a branch to finishing up my DIY tree—plus I’ll share some great projects readers have made using this tutorial!

Inspiration for my tree
One day while we were at my parents’ house, my dad and I went out into the woods behind their house and emerged with two branches. Below is the cat tree before photo…just a bunch of branches!
I had a big vision for these branches! But first I had to let them dry out indoors, so while I was doing that, I started browsing some inspiration for realistic-looking cat trees.

Some of my favorites are at Pet Tree Houses. They do some really stunning work. Definitely check them out if you’re in the market for a cat tree but don’t have the time to put in to doing one from scratch!
I tempered my expectations and decided to take bits and pieces from each design to incorporate in to something that I could realistically make. So I sketched out a super advanced design with a pencil and paper. With these fool-proof plans ready to go, I started gathering supplies.

Supplies used
(Affiliate links below; read more about those here)
Branches & support pieces
- A big branch and a small branch. My small one is about 3′ tall, and my big one is about 5.5′ tall
- A paint scraper—like this one here
- Minwax Stain in Natural and Rust-Oleum Ultimate Polyurethane in Satin
- Small hand-held saw
- Sisal for scratching post portions
- Faux vines—mine are old from Jo-Ann (Note: don’t use faux plants if your cats like to eat them. My cats don’t touch them, but would eat and throw up real plants.)
- 2″ x 48″ dowel, cut in two pieces for the scratchers (here)
- 2.5″ wood screws
Base & platforms
- One piece of 3/4″ plywood cut to 2′ wide by 3′ long
- 2 pieces of 1″ x 3″ x 8′ pine for the base’s ledge
- Rust-Oleum Wood Stain in Kona and Minwax Polyurethane in Semi-Gloss
- Decorative rocks—browse them on Amazon here
- Stepping stones from Lowe’s—here
- Pine scrap pieces in various sizes for the platforms
- Brown faux fur fabric—reused
Miscellaneous tools & supplies
- Miter saw
- Drill—I have this one
- Assorted sandpaper—I used 100 and 150 grit
- Hand-held staple gun
- Liquid Nails Heavy Duty Construction Adhesive—it’s cheap and wonderful
- Various sized nails and screws
(Remember to wear a mask and eye protection while sanding and working with wood, and wear an appropriate mask while working with paints, stains, and finishes. Follow the directions and warnings from your particular brand. Do not use any tools without proper training, precautions, and supervision from a professional. Read my full terms of use here.)
Step 1: Remove the bark
The first step for my DIY cat tree using a real tree was…to find a real tree and prep the branches! Once our branches were sufficiently dry, we stripped the bark off and then finished and sealed them.
This is actually a lot of work, so I broke those steps out in to their own detailed post about how I stripped, stained, and sealed my branches! You can see my full post on how to finish branches for decor here. But here’s a glimpse at the very messy and very frustrating but very rewarding process:


Step 2: Sand & stain branches
After we stripped the bark off, we leveled the branches as best we could. Some people recommend a laser level, and while I’m sure that would have been 10000% times easier, we leveled the tops and bottoms of the branches by eyeballing and then sawing off very small portions at a time.
Next we used sandpaper to sand the branches. This helps you get any remaining pieces of bark off and just smooth everything out. Then wipe down the branches.
And then you can apply a stain of your choice. I used Minwax oil-based stain in Natural. I wanted the branches to keep a pretty, well, natural-looking finish. But I wanted to deepen the color and make a bit more rich.


Step 3: Apply a finish coat
I used a water-based polyurethane with a very matte-like finish to apply two thorough coats on the branches. Again, I wanted to keep a natural look. Nothing too glossy. Here are a few pictures of the finish freshly applied (first three pics) and dry (fourth and fifth pics).


Step 4: Attach branches to base
First, we pre-drilled holes in the branches. Our branches had a few cracks from drying, so we made sure to avoid those areas when drilling. We positioned and attached the branches to the main base piece, the plywood, by screwing 2.5″ screws up through the bottom of the plywood and into the branches.
We also added Liquid Nails on the bottom of each branch before screwing them on. Next, we built out and finished the base. We built a raised edge all the way around using 1″ x 3″ pine pieces cut to length.
This serves two purposes: it covered the rough edge of the plywood while also creating a space for rocks to make the tree bottom heavy. I stained the entire base in Kona and finished it with two coats of semi-gloss polyurethane.


Step 5: Create scratching posts
Once the base was finished and the two branches were attached, we worked on the scratching posts. We made the posts using a 2″ x 48″ wooden dowel cut in to two pieces.
I stained and finished these in Kona and semi-gloss poly to match the base and glued sisal rope around them. To get the sisal rope to stay while the glue dries, we shot in a few staples with a hand-held staple gun. (We removed to protect our cats’ claws when the glue dried.)
Then we dabbed some Liquid Nails on the bottom of each post and screwed them in to the base just as we did the tree branches.
We used a combination of Liquid Nails, screws, and a nail gun to secure each platform in place. Here’s my dad looking adorable while we were attaching the platforms!


Step 6: Build & install platforms
I grabbed four scrap pieces of pine to use for the platforms. I loved being able to use these little pieces that had just been sitting around! The back scratching post platform is very small—more like a step stool for the little girl—while the front scratching post platform is a bit bigger.
The two higher platforms are about the same size—big enough for King Henry to max out. We also build out a tiny little ledge around the highest platform to coordinate with the base.
I decided to do a mix of stained (Kona) and finished (semi-gloss poly) platforms to match the base and platforms upholstered with faux-fur fabric. They had the same faux fur on their old cat condo, and they loved it, so I just reused that.


Step 7: Add finishing touches
Yay, almost done! Time for the finishing touches. I put a few cheap stepping stones and big rocks in the base to keep the tree bottom heavy. The rocks are big enough so that neither cat will understandably mistake the base for a litter pan and Henry won’t eat them (he is an asshole and eats lots of things he shouldn’t).
The stepping stones allow them to walk around the base and helped me keep costs down since they were so much cheaper than the rocks. I also picked up some faux vines to wrap around the branches. I would not have used these if our cats were into eat fake plants, though. They ignore them.


Total cost for this project
You’re going to love my total cost for this project. The tree I really loved was $800 (and used fake branches!). For my tree, I spent…
$75.12!
Here’s the breakdown of what I paid (I did use coupons for a lot of this):
- Satin finish for the branches ($6.00)
- Semi-gloss polyurethane ($6.47)
- Faux vines ($12.99)
- Decorative rocks and stepping stones ($25.07)
- Lumber for the base ($13.14)
- Wooden dowel ($7.98)
- Liquid Nails (3.47)
Everything else? It was found, foraged, already owned, or borrowed with the help of my sweet dad!

More trees from my readers
Over the years, I have had a few readers reach out to let me know they used this tutorial to make a tree for their kitties. They graciously allowed me to share them to help inspire you all to create your own!
Bryan’s tree…
Bryan has some great tips, and I love how he added the L-brackets to secure the top platform to a wall to prevent swaying. Thanks for sharing, Bryan!
Hello, just wanted to pass on a short note of thanks for you wonderful cat tower project design! I recently became a Cat Daddy again, and my new baby (Wesa-Ki) is a very energetic Maine Coon kitten. He’s been a climber from the word Go, so I started looking around for something not out-of-the-box for him to get his exercise and observations. When I found your blog post, I said “Oh YEAH!” 😉 It took me about 6 weeks of gradual work, and learning new tricks to do this solo, but I always love a good challenge.
A few tweaks from your design, I extended the base width to 4′, and since it wasn’t going in front of a window, I extended the short side tray pieces of the top platform to extend to the wall. Added a couple of L-brackets to secure it to the wall, and gained some great stability to the tall branch, as it had a bit of potential sway at 5.5′ tall. Even using a 5″ lag bolt to secure it to the base, and using baseboard brads around it, there was just a bit too much play in it, but it’s rock solid now! The kitty and I thank you again!
-Bryan


Alex and Julia’s Tree…
My jaw dropped when I got this email from Alex and Julia. Their tree absolutely blew me away! I love how it goes from the floor to the ceiling. It truly looks like it is growing up through the house. I am now extremely jealous that my tree doesn’t do this, lol.
Here are a few things they did that I also loved—
- After scraping all of the bark, they filled the cracks with resin: “The only real step we did that you didn’t was to fill the cracks with epoxy resin stained with mica powder in a dark chocolate colour and sanded it back to a smooth finish afterwards. It took ages!” Genius.
- I love the “toadstools” as well. You can see how they made those by stacking batting in one of the pictures below with Julia.
- The branch that stretches out far to the side of the main tree—you can see that it is pretty thin and might be wondering how it is supported. If you look closely at the pictures below, you can see that they added two L brackets to the wall to help.
- On that same perch, they very smartly made the fur topper removable by using what looks like tied cord and hooks screwed onto the bottom of the perch. Excellent idea for washing, and I’ll probably do that when I get around to replacing ours!
Thank you Alex and Julia for sharing!!


Pin This!


I’m so in LOVE with your cat tree! Found you on Craftgawker! Pinning for reference later! Thank you!
Thanks, Donna!! They love it too 🙂
This. Is. AMAZING. Fantastic job- I’d love it if you’d link up to Talk of the Town!! http://www.sadieseasongoods.com/talk-town-link-party-14/
Aww thank you so much! Just linked up and adding a shout to the party in the post now. 🙂
LOVE this, and every cat in the world would love it too! Thank you so much for sharing with us at Talk of the Town.
Thank you, Betsy! My babies definitely do love it. I was so afraid that I’d spend all that time making it and that I’d get more enjoyment out of it than they would. Cats are weird like that. Luckily that wasn’t the case! 🙂
I love this what a great job u did and I hope u make more thks for sharing it
You did a great job on your cat tree. When my cats wear theirs out I may just give it a shot and try and build one with real tree limbs. Pinning!
Thanks a lot, Linda! They sure love it and I’m sure yours would too.
Great job! Have plenty of branches and just need to find space to work on this. Oh yes, both Dad and kitties are adorable.
Yes it did take up a lot of space while we were working on it. Good luck!!
Visiting from the Talk Of The Town Party – what a lucky cat! My Rexy would crazy for one of those. Pinning to share and refer back to. Love it!
Thanks Marie! Yes, lucky brats. Love them. <3
this is seriously so awesome, you win the best cat mom award! i saw this featured on talk of the town party, and had to come see for myself and give you some kudos!
b
Thank you so much! I didn’t realize it was featured, so thanks for the note–I’ll head over there now!
I love this! We currently have a DIY cat tree that my husband made over 2 years ago. He wrapped it in leftover carpet and sisal. I’m really wanting a new one that isn’t so obtrusive, and your tree would be perfect. I have one concern though.. I have 2 cats, one tiny one and one HUGE fat one. He weighs about 17 pounds, and when he jumps on our current tree it really gets swaying. How sturdy is this construction for a fat cat?
Good question. This was a big concern of mine as well because Henry is a big guy. He isn’t fat, but he is very long, so he is heavy. All three of the bottom posts are completely stable when he jumps onto and off of them. I think the combination of Liquid Nails Construction Adhesive and long, heavy-duty screws helps with that. The high branch has a bit more give to it when he is going crazy and running up and down the tree. When he is sleeping on it it’s fine, but jumping on and off makes it sway a bit. It’s not going anywhere, but it’s not rock solid. Cutting that branch down to not be so tall would fix that, I think, since it doesn’t have anything to stabilize it in the middle or on the top. That’s what I’ll do if the swaying ever becomes too much in the future, but for now it’s not bad (and less than the store-bought cat tree we had before, so I’m not too hard on my construction skills 🙂 )
This is beautiful! It looks extremely professional. Good job! I’m certainly going to pin this and come back later when I have space and time for this. This is amazing!
Thank you so much! I love it, too! I am even thinking about making a smaller version of it for my husband’s office. We’ll see where it falls on the project list. 🙂
I love it, I have been planning on making one. Thanks for the inspiration. P.S. I love how you talk about your dad.
You’re welcome and good luck! Dads are the best.
wow wow wow! i love it! good for you – so beautiful! What kind of tree branch did you use??
Hi Rachel! Thank you! We’re actually not sure. We pulled it out of the woods after it had already fallen, and I’m not very good at tree types. I can tell you that it wasn’t pine, though. 🙂
I love it very creative my daughter has two cats they probably would love this
I know mine sure do! And thank you 🙂
How large are the branches and how much weight did you add to the base? I ask because I have a couple cats who can jump on a sofa from 6′ away and almost tip it over so I need lots of weight to prevent this. Love your tree, it would provide lots of bird watching for my guys.
Hi Doris! Thank you! The big branch is about 5.5 feet tall, while the smaller branch is about 3 feet tall. I was also worried about Henry tipping this over…he is a big cat and a jumper. I used stepping stones to weigh the base down and added in polished rocks for looks, though they also added some weight. I’d say that with the stepping stones and rocks, it’s about 30-40 pounds on the base. No way they are making this thing budge!
I love this idea!! SO cute and practical!
Thank you! 🙂
Can you please tell me what kind of tree that was. Can I really use any kind of wood or are some trees better suited than others??
Hi, Chad! We’re actually not sure. It was on the ground in a pile when we found it, and there are several different types of tree in the area. I’m sorry!
Crap – I just got rid of some big branches from the tree behind the house! …I could have used those! Nice Job on the tree! !
There’s always more where they came from!!
Hi Brittany,
Now that is a great idea! I’m always amazed at how expensive cat perches are. I’ve always wanted to make one but never thought of using tree branches. We’ll be getting to work on this one pretty darn fast 🙂
Blessings,
Elizabeth
You dont really explain how you attached the platforms? And it doesn’t look like you drilled down through the tops into the tree branch…or did you?
We used a combination of Liquid Nails and drilled a hefty screw down through each platform into the branch. 🙂
WOW, awesome job!!! Our cat tree is the 1st thing you see when you walk int our beautiful, shabby Parisian front room and it is NOT attractive! We just bought it 6 months ago but I am selling it and making THIS beautiful one! Thanks for sharing!
Hi Marie!! Thank you and you are welcome! I hope your kitty loves the new one.
Such a great idea! Now I need to get my hubby to do it!
this. Is. The. Coolest. SO COOL. My cat would love this – except, so would my toddler, ha! Thank you for sharing at the Share the Wealth Sunday party – we hope to see you again soon!
Wow Brittany! This looks seriously amazing, my cats would absolutely love it. #SITS Blogging
And my brats have no idea how lucky they are 😉 Thank you!!
This is a great idea!! Have to pin it – Would love to have you share at the Pleasures of the NW’s DIY party!
http://www.pleasuresofthenw.com/do-it-yourself-craft-projects-link-up-31/
Thank you so much Helen!!
So I’m actually in pogress of building something similar to the awesome cat tree you built. I purchased the exact stain and finish that you used. Did you happen to research if these were safe for the cats after they are completely dry? I tried looking online, but haven’t really found anything. I would assume it’s ok because it can be used for household furniture, but when it comes to the health of the cat you can never be to safe. Thanks in advance for any help you can share!
Hi Andy! I felt comfortable using that finish because it is from a reputable brand and used in products around the home. As with any stain or finish, I just wouldn’t let them around it until it is completely dry. My weirdos have been using this tree for over a year now and are healthier than ever 😉 Good luck with your build!!
I’m not sure with this. But I’ll try this for ma own.
Thanks for this inspiring idea’s.
I do not have a Miter saw at my disposal nor can i buy one right now. Can you tell me if it was absolutely necessary to build this? This is so amazing, by the way. Thank you for sharing 🙂
Thank you so much! The miter saw makes it easier, that’s for sure. Do you live around a place that lets you rent tools? You could also use a circular saw, which are typically cheaper than a miter saw. I’d be hesitant to use a bow saw because I’d be worried about not being able to get a flat enough cut for the branch to stand, but I’m also pretty terrible and impatient when using handheld saws. 🙂
Great project! I plan to build one myself very soon. I am wondering though, what’s the diameter of the branch you used?
Probably about 4 inches on the shorter branch…the taller branch gets a little skinnier as it gets taller but is probably about 4-5 on the bottom!
Hi—I love this–I have 10—yes, 10 cats…all rescues!! I do TNR for a local Animal rescue organization in Erie, PA. Can I ask, Why did you strip and stain the branches?? Could they just be left natural, with the bark on–?? Thank you
Suzanne
Hi Suzanne, thank you! I wish we could have 10 cats! I decided to strip and finish the branches because the bark will eventually fall off, and I just wanted to give the branches a clean and finished look. 🙂
Love this design.
I would like to make infographic of all step in this article.
Can you help me?
I have sample here and have the plan to make infographic of all DIY product for pets
Love your blog
This is genius! Thank you so much for sharing!
I’m making CATTREE for my family cats.
Your detailed explanation was greatly helpful.
Thank you very much.
Far away from Korea
This is one of the most beautiful cat trees I’ve ever seen, for a price far lower than average trees in stores, and I’m sure it’s a lot of fun to make, too!
I absolutely love this. I currently have two feral. Cats are now indoor cats. I have two cats that belong to a deployed marine. I foster for military when they deploy and I will be getting too great Danes for a two-year deployment. I am looking at bringing in some of the trees that were cut down last year and putting them on the walls for the cats. I’ve given them an outdoor cat room for lack of a better word. However I am concerned about the stain and the sealant. Are they cat safe? It’s one thing for me to lose one of my precious pets. It’s another thing to lose a deployed, military person’s beloved pet.
Hi! I have not had any issues. It’s the same finishes I would use on furniture that I have around my kids and pets. And the way I see it, it’s a better choice than wood alternatives like MDF and other stuff store-bought cat trees might be made it. (Though honestly I think those are fine too, my cats mostly sleep on their tree.) If you are super worried, I would just not treat the branches or use a water-based finish! Thanks for everything you do for animals <3
My new human and I love this and had ideas to do something similar, but she says $75, is nowhere near the actual cost, at lease here in the Canadalands.
She also says that yours is WAY more time and work than she was imagining. We know those prices are in USD, but here and now the stain and protectant alone are nearly $20 cad each.
Yesterday she took me to Princess Auto discount store and only bought L-brackets and jute rope, and she says she’s already $40 in.
Add to that drying time, bark removal, and the fact that our work space and bigger tools are 1.5 hours away at my Grandad’s house and suddenly this has become a very daunting endeavour. She also calls me a little freeloader and doesn’t think I’ll be much help. I’m sure I could help with the dark removal, but she thinks my claws are too small, and that I’m too easily distrac…. hey, is that a dust bunny?
I think my human is back on the clicky mat searching Amazon and Temu for the $50-150 ready made trees. She says I probably wont be that grateful or impressed anyway.
Maybe she can satisfy her DIY ambitions with a scratching post and a few more crochet mice. I do like those.
Haha, you are right on the costs! Costs for everything here in the US have gone WAY up since I wrote this post. I made this about 10 years ago. It is still going strong, though! Making stuff for your cats is always a risk…will they actually use it?? Our kitties are still loving their tree, so it was worth it for us. But you gotta do what’s best for you <3