Butcher Block Coffee Table DIY
Learn how to make a butcher block coffee table from scratch!
How to make a butcher block coffee table
I’m really excited to finally share this one, because I’ve been working on it bit by bit for weeks. This is my butcher bock coffee table DIY project! I wanted to make a coffee table to replace the painted trunk we’ve been using for years.
Back when we lived in a super small one-bedroom apartment, we desperately needed all the extra storage space we could get. But now that we’re livin large in a two-bedroom apartment, we can afford to lose the trunk space for a real coffee table.
Instead of making a more traditional butcher block design that incorporates boards with many different lengths, I chose to keep my boards the same length. If you are edge gluing width-wise and length-wise, the tips in here and the steps are still applicable.

Supplies I used…
(Affiliate links below; read more about those here)
- 12 pieces of pine measuring 2 in x 2 in x 4 ft (I bought 6 8-foot pieces and had them cut in half)
- Rust-Oleum wood stain in Kona and Minwax polyurethane in semi-gloss
- Chip brushes (optional: foam roller for the wood stain)
- Liquid Nails Heavy Duty Construction Adhesive
- Sander with 100-grit sandpaper and one piece of fine sandpaper (I used 220-grit)
- A variety of clamps in sizes
- Saw
- Legs—I had mine made by this shop on Etsy
- Optional: Wood planer or hand planer
And here’s my butcher block coffee table DIY!
(Remember to wear a mask and eye protection while sanding and working with wood, and wear an appropriate mask while working with paints, stains, and finishes. Follow the directions and warnings from your particular brand. Do not use any tools without proper training, precautions, and supervision. Read my full terms of use here.)
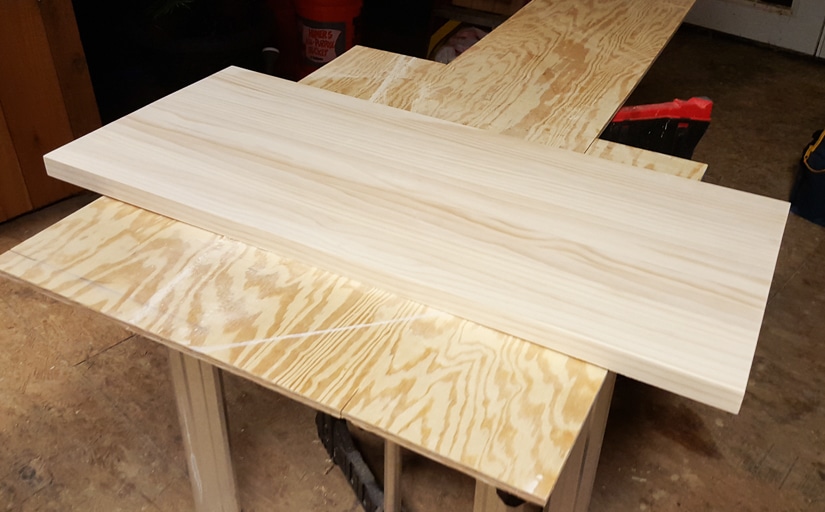
Step 1: Join the planks together using glue
I edge glued the boards together using Liquid Nails and a variety of clamps. First, I ran a line of glue along each board and pressed them together. Then, I applied pressure using bar clamps. See my article on tips for joining wood planks together for more on that topic!
(I have seen many debates over whether glue alone is enough to hold wood boards together for a tabletop. I can say that it has certainly held up well for us! The table has withstood a lot, and it is still in one piece 7 years later.)


In addition to applying horizontal pressure, I applied vertical pressure. The picture below shows the right two boards popping up slightly. Adding vertical pressure using C-clamps fixed this problem really easily. I just put a piece of scrap wood covered in painters tape between the glued boards and the clamp.
I wanted to be able to safely remove the clamp and board when the glue dried, so I used painters tape. The tape made that very easy. I completed the edge gluing in several sections. First I clamped a set of 4 boards and a set of 3 boards. Then, when those sets dried, I added additional boards to each set until I had a set of 7 boards and a set of 5 boards.


Step 2: Run the pieces through a planer
After I had 2 sets of boards (1 set of 7 and 1 set of 5), we ran each set through a planer. I would have finished the table and run the entire thing through the planer, but as you can see below, the planer isn’t wide enough.
My dad did the planing for me. He is a licensed contractor and has a lot of tools that I don’t have. 🙂 And thank god for that! I know you can rent tools, and I could have rented a planer wide enough for the entire tabletop. But heading over to dad’s shop is just easier.


Step 3: Join the two sets of boards
The most exciting part…joining the two sets of boards together to make a table top! Having a second set of hands for this was really helpful! (Thanks, dad!) The size is just perfect.

Step 4: Square off the edges
When the final glued edge dried, we drew a straight line along the table’s jagged ends and used a skill saw to cut an even edge. Since this was a free-hand cut, we clamped a straight board to the table top to use as a guide for the saw (below, center and right photos).
We unfortunately did have a bit of splitting occur on one end of the table. We were able to cut off most of it when we straightened out the edges, but we lost about 6 inches total. That was a bummer, but we were working with imperfect wood, so it wasn’t completely unexpected. We could have avoided this by planing each individual piece before edge gluing them together. I’m still happy with the result!


Step 5: Sand, stain, and finish
Then I sanded down the entire top using 100-grit sandpaper. There were a few bumps and bad spots that needed evening out. I also slightly rounded all edges and corners and finished the piece off by polishing it with 220-grit sandpaper.
For the stain on the table top, I used one coat of Rust-Oleum wood stain in Kona. I used a mini foam roller that my dad was planning to throw out. It made the job really quick and easy. I really love the deep Kona color.
After the stain had dried completely, I gave it three coats of Minwax fast-drying polyurethane in semi-gloss, sanding lightly with 220-grit sandpaper between each coat.


Step 6: Attach the legs
Once the final coat was dry, the hard part was done. I chose to use a black steel A-frame leg that I purchased here from the ECon Welding Etsy shop. It was between these and hairpin legs, and I ended up wanting something just a bit different from hairpin legs.
They came with holes in the legs, so all we needed to do was drill the legs on. I just used wood screws, flipped the table upside down on the floor, positioned the legs, and screwed them in.
I just love it! It turned out perfectly. It’s a wonderful size for our living room. Here are a few photos of the finished table when it was finished


For more table DIYs, check out the DIY toddler table I made, the DIY lego/art activity table I made for my daughter, and the outdoor coffee table I made using pavers!
Pin by butcher block coffee table DIY!


This is great. I am planning to use island butcher block to create low sitting dinning table. The butcher block would be of size 84 L x 36 W. Any idea how can I use wooden feet that is about 11 to 12 inches high?