DIY Cat Condo Using Ikea Tables
This tutorial shares my DIY cat condo using Ikea tables—and no power tools!
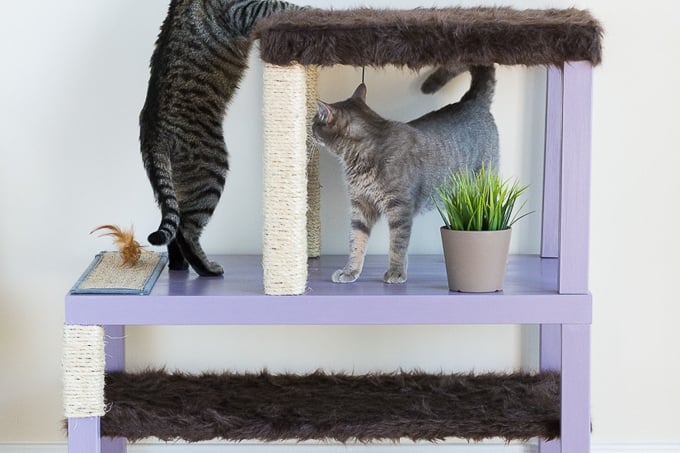
How to make a DIY cat condo using Ikea tables!
We have two very spoiled kitties named Henry and Blanche. Henry is almost 2 years old and Blanche just turned 1 a few months ago. They’re both rescues and are very active.
They love to run around and chase each other, and they are not de-clawed, so we need to make sure they have plenty of entertainment and scratching posts. We have two cat trees with scratching posts and lounging spots, but both trees are pretty ugly and falling apart.
Unfortunately cat trees can also be pretty expensive, so I’ve been researching ideas for an aesthetically pleasing DIY cat tree. This idea really sparked my interest, especially since I already had one of the tables I’d need, paint, and a staple gun.

Supplies I used…
(Affiliate links below; read more about those here)
- Ikea LACK Coffee Table
- Ikea LACK Side Table
- Sisal rope
- Hand-held staple gun
- Gorilla Glue
- Faux fur fabric
- Paint
- Small hook eye
- Various toys (Update: mouse is being replaced with this bird, which Henry loses his mind over)
And here’s how I made a cat condo using Ikea Lack tables!
Step 1: Apply faux fur sections
To get started, I made sure both were disassembled so the legs weren’t in the way. I had eight legs, two tops (square and rectangle), and the coffee table’s bottom shelf. First I worked with the top of the smaller table and the shelf on the larger table because I was adding some faux fur to them.
I laid the top of the smaller table and the larger table’s bottom shelf on the back of my furry fabric. Then I cut pieces that were just big enough to wrap around the entire table top and table shelf. Using the staple gun, I stapled the fabric over like I was upholstering a chair cushion.
Henry loved the fabric and enjoyed helping me cut it out—this these spots have definitely been some of his favorite places to lay since he got his new condo! If you want to be able to remove the fabric to wash, I recommend cutting pieces just large enough to cover a surface area.
Then you can attach them using velcro pieces glued to the back of the fabric and the top of the surface area you’re covering. You could spot treat and vacuum attached fabric, though.

Step 2: Create scratching posts
I created the scratching posts using sisal rope. But I decided to wrap only two and a half of the side table’s legs. I bought two 50-foot rolls of 3/8-inch sisal and used it all. Mostly I just didn’t want to buy any more, so I used what I had.
To wrap the sisal around each leg, I ran strong super glue up and down the table legs. Then I began wrapping the sisal tightly around each leg, stapling every few inches using my staple gun as I wrapped. The goal of the staples was to hold everything in place while the glue dried.
After the glue dries, you can remove the staples with pliers. If you keep the staples in, you do run the risk of your kitty’s claws getting stuck in one. You could mitigate this risk by putting the staples on the back-side of a post, but it’s easiest to just remove them and not have to think about it!

Step 3: Paint pieces
At this point, I had seven pieces that I hadn’t touched: six table legs and the coffee table’s top. I decided to paint these pieces using some leftover paint I had in the closet. I mixed a few colors from the DecoArt Americana Decor Chalky Finish line and ended up with a purple. Paint is optional for this project.
This paint sticks to anything, meaning it sticks just fine to the slick Ikea furniture finish. I used a matte finish because I wanted the piece to look polished, but I didn’t want it to look shiny. This paint held up really well, too.

Step 4: Assemble all pieces
When the paint was dry, I assembled the pieces. First I assembled the coffee table by screwing all four legs on and setting the furry shelf in. Then, I assembled the side table by screwing its legs into the bottom of the table. If the faux fur fabric is getting in the way, just snip a bit off.

Step 5: Glue cat condo tables together
Before I attached the two tables to one another, I needed to decide how I wanted the finished piece to look. I wanted the higher side of the piece to back into the corner of our living room wall, so I positioned the side table so that the scratching post legs were not against the wall.
When I was happy with the arrangement, I dabbed some strong glue onto the bottom of each of the four side table’s legs. Then I carefully put the side table on top of the coffee table and placed a few heavy books on top of the side table to ensure the glue got a firm bond. You can use clamps if you happen to have them, but random heavy objects work well, too.
If you like this project, check out my indoor cat house build plans, my raised pet feeder for cats and a sleek feeder for dogs, my easy cat scratching post, and my DIY cat tree using real branches.
Step 6: Adorn with toys
I stuck a small hook eye into the bottom of the side table so that I could hang one of their toys from. I also glued one of those door knob scratchers that they never used onto the top of the coffee table. All the work adding toys and scratching objects, though, and they still prefer to just sleep on the furry levels. 🙂

And that’s my DIY cat condo!
As you can see, this is a really easy homemade cat condo made with inexpensive Ikea tables. It doesn’t require any power tools, and you can easily customize it. I’m so pleased with how it looks, and my the cats love it!


Pin my DIY Cat Condo Using Ikea Tables!


FABULOUS!
🙂 Thanks!
like the condo… been thinking of something like this for my hubby’s cats
It was really easy to make. 🙂
Love this! We are in the market for a new cat tree, and prefer a DIY route. How clever! Lucky cats 🙂
They love it! And there are so many good DIY options out there. I wanted to find some good secondhand furniture, but I liked how easy the Ikea tables were to work with. Good luck 🙂
Finally a cool looking cat condo idea that doesn’t have you buy 2×4 lumber – LOVE! This would work with a thrift store table too. I might try a skinnier – taller version for our newest addition, Wolfie, who showed up in the yard one day, skin and bones and super skittish. Now he feels at home and the addition of a cat condo would be the icing on the cake – and keep him from clawing at the carpet and rugs. Purrfect!
Aww, welcome home, Wolfie! Henry isn’t a big scratcher, but Blanche is (the smaller one). She loves stretching up from the floor and clawing the outermost post. I had thought about doing a thrift store table as well, but I couldn’t find something, and my impatience got the best of me.
LOVE! Told my hubby we are making this for our two cats 🙂
Yes! They will love it!!!
This is super lovely!! Well done! 🙂 xox
Thank you!
This is a fabulous idea and we’ll definitely do something like it when our current scratching post/perch starts to disintegrate 🙂
You could always make it now…I’m sure they wouldn’t complain! Our living room has three cat trees in it. I felt bad for them because they are indoor kitties cooped up in an apartment, so they need plenty of entertainment. 🙂
So cute! Love that it’s easy to do and very customizable. Do you have any measurements for how tall the finished piece is? Just rescued a kitty and want to make her something she can relax on while watching out the window 🙂
Hi, thank you! The total height is 36 inches. If you want to go the Ikea route and that isn’t the height you want, they have lots of other affordable options for tables with different height options. Enjoy your new kitty.
I love the end results! Fabulous idea! Would you mind telling me the cost of this project?
Hi, Molly! Thanks! It’s hard to say what the exact final cost was because I had some of the materials already. I already had the smaller of the two tables and repurposed it for this project, but it was $10 when I bought it. The bigger table is $25. I used about $10 worth of sisal rope for the scratchers, and I already had the staple gun, which was under $10 new. The paint I used is ~8.50/can (it’s the Americana Decor Chalky Finish brand, but I mixed two colors), and the fabric was a faux fur from Jo-Ann that was ~8.99 (always search for a coupon before shopping at Jo-Ann!). I think Gorilla Glue is about $5. So if you’re starting from scratch, you’re looking at ~$80. If you want to keep it cheaper, you could always do two of the $10 tables stacked on top of one another and not paint it. I didn’t originally plan to paint it, but I had some paint already, so I went for it.
Thank you! I just happen to have an old coffee table and an unused side table. After pricing out cat trees, this DIY will be quite a life saver! Awesome job!
Thanks, Tami! Good luck with yours!!
You’ve got a Lotta time huh? I like it.
I just love my babies. 🙂
OMG!!!! You are a genius!! I just ordered both the tables online from ikea…. thank goodness I could order it online, ikea is an hour away! I just got 2 new kittens and I cannot wait to make this for them!! Eeeee…. I am so giddy. I’ve been searching for the perfect cat ‘play house’ and everything in the stores is either way too expensive or way too boring! You are a life saver, only wish I could tell you in person. THANK YOU!!!!
-xoxoxo
Awww, you’re sweet!! I hope your kitties love it! 🙂
AMAZING SO FAB THANKS IT LOOKS BEAUTIFUL
I made this yesterday with my daughter and my cats LOVE it. Even my cat who hides all day long came out after it was made and she has been using it ever since. This has been a god send!
This comment makes my WEEK!! I am so glad your kitties love it, even your shy girl!!
Awesome! The cats must love it! Pretty and useful…two in one!…always great.
Thank you Jacquie!!
Hi – I LOVE what you have done here! I am going to modify the idea a bit to fit in a tight corner. I was thinking of using maybe a combo of the LACK side table with several EKET cubes. I was wondering – how is it holding up with just Gorilla Glue? I was thinking I would reinforce with brackets, but all the other hackers I have seen are using only glue. Does the glue really keep it all together? We have 2 kittens that will be getting bigger and bigger everyday – needless to say they are wild monkeys right now, flying off everything. Can Gorilla Glue withstand crazy kittens/teenagers?
Looking forward to your feedback!
Purrs & Love
We used your idea to build a kitty condo to put by our bedroom window. I wanted something that matched the rest of our furniture and this completely worked, so thank you so much for the idea!
I wish I could post a pic for you, it turned out great!
This did not work for me. I’m not sure if it’d because they’ve changed the lack tables to have more square legs or user error. The rope would not stick to the legs. I used a staple gun but that did not help. I ended up using nails to secure at the end. Great idea, just wish it came together better for me.
Oh bummer! Yeah, it has been a while since I made this one, and it’s possible they changed the finish on the tables 🙁 I hope your kitties love your end product!!