DIY Insulated Window Coverings
Today I’m sharing how I made DIY insulated window coverings using only basic sewing skills!
How to make DIY insulated window coverings
One of the best things about our new apartment is that it has TONS of windows. It isn’t a new building, though, so the windows aren’t terribly energy efficient. A few weeks ago we had our first night where the temperature dropped below freezing.
And you could literally feel the cold air seeping through the windows. Even if you don’t care about saving energy, everyone likes a lower heating bill. Couple poorly insulated windows with two people who need complete darkness to sleep, and thermal blackout shades were in order.
We already have blackout curtains hung on our bedroom (pictured below), and they do a good job, but light still does come in through the top and sides of the windows. And despite being marketed as insulated curtains, they don’t seem to do much to keep the cold out (though they do a great job of blocking the sun out in the summer).
Cue my idea to make a thermal, insulated blackout shade that lined the entire window. I figured, why not? Pretty low threat experiment.

For more easy projects for the home, check out my tutorial on recaulking cracked staircase stringers, installing a peel-and-stick glass tile backsplash, and creating a drawer organizer for spices!
How I decided on my approach
The idea behind the “thermal” part of these shades is actually pretty simple: think of a giant potholder. Potholders have a material inside of them that reflects heat or cold back to its source.
You can purchase this material, Insul-Bright, from Amazon or any other fabric store. As for the blackout part, I sewed two pieces of fabric together, one blackout piece and one decorative piece, leaving the bottom open to slide the Insul-Bright piece in before sewing it shut.
Since my windows are pretty big, I’m going to show you step-by-step photos of a much smaller version, an imaginary window that is 8 inches by 12 inches. The process will be the same no matter how large or small you make your shade. The size all depends on the window you’re fitting it to. So let’s get started.
Supplies I used…
(Affiliate links below; read more about those here)
- Insul-Bright
- Blackout fabric
- Measuring tape, scissors
- Decorative fabric
- Sewing machine or needle and thread (see the end of this guide for some suggestions on sewing these curtains by hand)
Step 1: Measure the windows and fabric
I always forget to measure and then eyeball the measurements at the store. Then I’m left with either not enough fabric or way too much fabric. Make sure you know how your window measurements translate into yards.
You also need to decide if you want to make your shade fit into your window or sit on top of it. I measured my window to ensure my shade would fit into the window. Let’s pretend that my window is 8 inches x 12 inches for this tutorial.
You’ll need enough Insul-Bright to fit your window, but make sure to add at least 1/2 of an inch to your measurements when purchasing the blackout fabric and decorative fabric. The extra 1/2 inch will be your seam allowance.
Step 2: Cut the fabric
Cut your Insul-Bright to be the exact measurements of your window (8 inches x 12 inches in my case). Then take those measurements and add a .5 inch seam allowance on to get the dimensions for the blackout and decorative pieces (8.5 inches by 12.5 inches in my case).

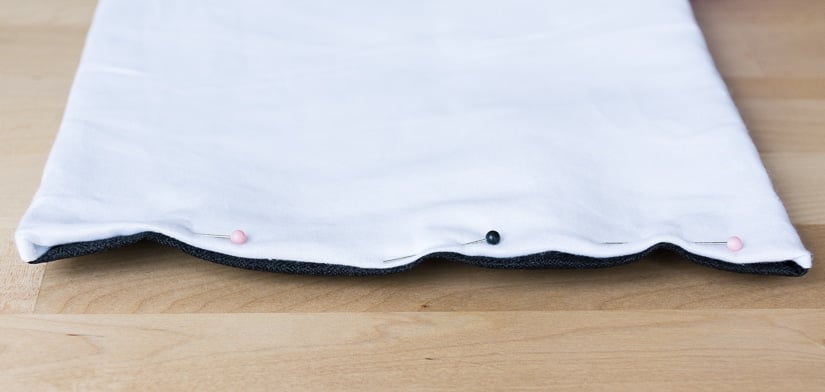
Step 3: Sew the blackout and decorative fabric
With the right sides of the blackout and decorative pieces facing one another, sew three sides shut. When you’ve sewn up three sides, flip the shade right-side out. You can press the seams if you want a crisp finish.


Step 4: Add the insul-bright fabric
Slide the Insul-Bright piece into the two pieces of fabric you’ve sewn together. The best way to do this is to reach up into the top corners of the shade and pin the Insul-Bright piece in from the outside. Or you can just shimmy it in. Once the Insul-Bright is in place, fold the open edges over, pin them shut, and sew it up.


And here’s the real thing—the larger DIY insulated window covers we made for our terrible apartment windows in the bedroom.

Tips and modifications for your DIY thermal window shades
- If you don’t mind exposed Insul-Bright or blackout fabric, you can skip the decorative fabric step and use two sides of blackout fabric instead. I decided to use decorative fabric because I wanted it to look relatively nice when I had it hanging.
- If you don’t have a sewing machine and will be sewing by hand, that’s okay! It will just take a bit longer. I’d suggest ditching the decorative piece–doing so will save you some time and almost certainly some frustration. If you don’t even want to sew by hand, check out this fabric glue.
- I cut pieces of blackout fabric from some old blackout curtains. However, you can buy blackout fabric by the yard. Either option works.
Pin my DIY insulated window coverings!


In the picture where the blackout fabric is up, what method did you use so it would stay rolled up?
Hi! I’ll be posting a separate post tomorrow about how to hang and store the shades…I’ll send you the link!
I wondered the same. How do the black out thermal curtain connect to window and roll and unroll to use?
Please send link to me too. Very warm idea.
Here it is!
So beautiful and brilliant idea. There is a variety of shades available in the market so a buyer is free to pick and choose the color and design of their own.
May I also have the link? thank you!
Here it is 🙂
What a great idea!
Thanks Lauren!
Such a great idea. Can’t wait to view roll up post to see how you did it. Thanks for joining us at the Inspiration Spotlight party. Shared.
Thanks for stopping by and for your kind words, Theresa!
We live in Texas. I did basically the same thing but sandwiched in reflectix. It’s a great heat reducer. Reflects it back out the window and they worked great! I just used white and light colored flat sheets for the envelope to hold the reflectix (sp? I got mine at Home Depot) To hang, I created a casing at the top, ran a 1/2″ pc of conduit thru the casing which performed like a curtain rod. Since I wanted mine inside the window and up against it, my husband bought some 1 hole straps made of pvc similar to these: https://www.amazon.com/Bridgeport-921-4-Inch-One-Hole-10-Pack/dp/B003YXZCYY/ref=sr_1_9?ie=UTF8&qid=1513534249&sr=8-9&keywords=1+hole+pvc+straps