DIY Raised Dog Feeder
This post shares free DIY raised dog feeder build plans. Learn how to make a chic, modern DIY dog food stand for the pup in your life!
DIY Raised Dog Feeder Build Plans
Hey all, boy do I have a treat to share today! I’ve teamed up with Anika from Anika’s DIY Life on a new build. If you’re a dog lover with refined taste, you’re going to love this one, too—free plans to build a modern raised dog bowl feeder.

I made a smaller raised cat feeder a few years ago and thought it was time to get a raised dog bowl feeder into the build library. This is a relatively inexpensive build, too. The construction is a bit more complicated than I would have like, but the extra work saves you time on the back end.
That’s because we used pocket hole joinery for this build and designed it so that all pocket holes are hidden on the bottom or back of the feeder. (See my post with free projects that use pocket hole joinery!)
That means no extra time spent filling them. If you hate filling pocket holes like I do, that’s a major plus.
SO HERE’S WHAT WE USED:
(Affiliate links below; read more about those here)
- 2×2 pine
- Miter saw
- Power drill and right-angle attachment
- KregJig K4
- Orbital sander
- These dog bowls
- 2 1/2″ pocket hole screws
- Wood glue
- Bar clamps in various sizes
- Measuring tape and pencil
- Black paint, FrogTape, and matte finish
- Safety equipment
And here’s an overview of our wooden DIY dog food stand.
(Remember to wear a mask and eye protection while sanding and working with wood. Do not use any tools without proper training, precautions, and/or supervision. Read my full terms of use here.)
See a video of this build here; read the step-by-step overview below. When you’re done, grab the free printable build plans here over on Anika’s site!
Step 1: Begin by assembling the top.
After I cut all pieces and drilled all of the pocket holes, I began by assembling the top—the area where the bowls rest. This was the trickiest part of the build and took multiple tries and THREE TRIPS to Home Depot to get just right.
The bowls don’t provide much wiggle room, but don’t worry—follow the measurements in the free plans linked below and you’ll be all set!
I reinforced all pocket hole joints with a bit of wood glue.


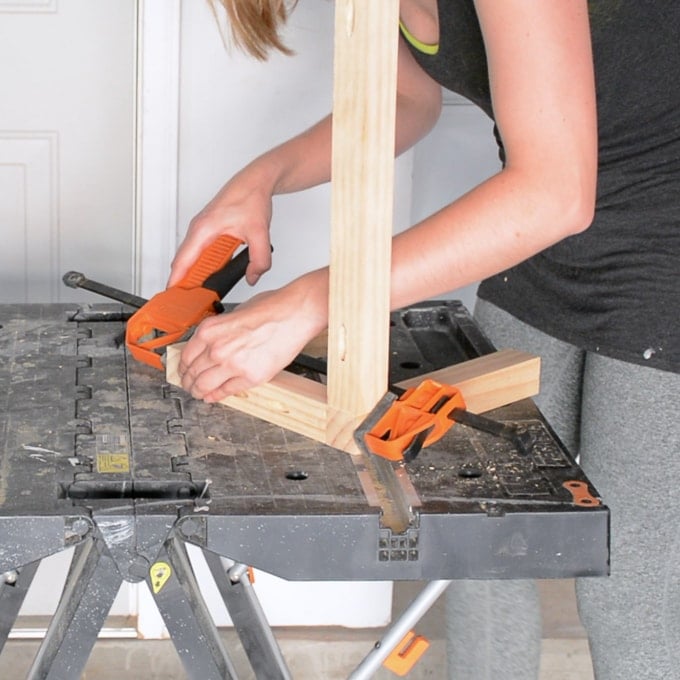
Step 2: Start assembling the base.
Next I assembled two of the double L-shaped pieces to begin forming the base. Each double L-shaped piece consisted of two horizontal bottom pieces and one vertical side piece.
Since we designed this to have all pocket holes facing down or back, this required some creative clamping. You could probably get around this if you had an extra set of hands, but I was working solo.


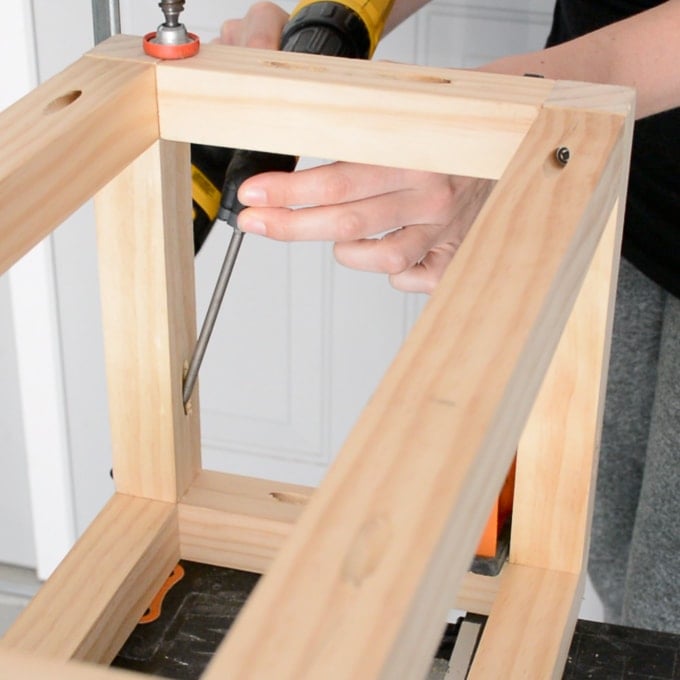
Step 3: Finish off the base.
Once I’d finished each of these, I added additional vertical side pieces onto each double L-shaped piece—then joined everything together to create the entire base.

Step 4: Attach the base to the top.
I attached the base to the top I built in step one. The back two pocket holes required a right-angle attachment for my drill. See this post for more about how to reach pocket holes in tight spaces.

Step 5: Sand and finish.
After I’d assembled everything, I used my orbital sander to smooth out any minor uneven spots or rough areas. This was a really important step because I wanted all of the joints to look really seamless.
I finished off the piece using my current favorite water-based polyurethane in a matte finish. I love this finish on unstained wood. It keeps the natural look of the wood, but it also protects it. This stuff is really durable; I used it on Ramona’s dollhouse bookshelf build, the cat house side table build, and the plywood planter with hairpin legs build.
I also gave the bottom of the feeder a dipped look using FrogTape and DecoArt Satin Enamels paint in Classic Black. Not necessary, but it’s a nice extra touch to get that sleek modern look I was going for. 🙂


When I was getting some pictures of the feeder, I grabbed these pictures of Blanche. She looked like she was wondering what the **** was going on and why there was a dog bowl feeder in her house. <3


Remember, you can grab the build plans for this raised dog bowl feeder, including a full cut list, at Anika’s site!
Pin our DIY dog food stand project!


Looks great and most useful with all left over wood pieces.
Thanks James! I love a good small project to use up scraps!