DIY Hanging Plant Holder
This will teach you how to make an easy wooden DIY hanging plant holder! You can make wooden hanging plant pot holders like these using just a handful of supplies—including scrap plywood from a previous project.
DIY Hanging Plant Holder
Another planter? Yeah, you read that right. But this planter isn’t so much a DIY hanging planter as it is a DIY hanging plant holder. I mean, the plant it just in a pot. It’s the nifty wooden hanging part that’s holding the pot suspended in the air. And it’s part of July’s At Home DIY challenge, which has a theme of 2-hour DIYs!
And the best part about this is that I only had to buy the leather for the straps. (Yes, sorry animal lovers, but I did use leather. For what it’s worth, I thought it was faux leather when I bought it, especially given how cheap it was.)
I used a scrap piece from a previous project (explained in step 1). I knew I wanted to make some sort of hanging plant holder like this one I made years ago. While I had a piece of wood and a pot that fit perfectly in it, I wasn’t sure how I wanted to hang it because I didn’t want to use chain.
Then I saw my friend Melissa from Welcome to the Woods do a similar project, and I was in love with it. I loved how she hung hers using rope. I borrowed from her approach using leather instead, and I also added some beads and glue for a decorate detail and to help reinforce the knots on the bottom of the planter.

SO HERE’S WHAT I USED:
(Affiliate links below; read more about those here)
- Wood
- Hole saw or jigsaw
- Cordless drill and assorted bits
- Leather rope (or other strong rope)—similar to what I used here
- Strong glue
- Sandpaper
- Large beads (similar here)
- Desired finish (here is what I used)
- Plant pot—discontinued at Ikea
- Hook —I needed one with a drywall anchor
And here’s how I made my wooden DIY hanging plant holder.
Step 1: Prep the wooden holder
First I prepped my piece of wood. This piece was a test piece from a previous project, so the hole was already drilled and the piece was in great shape. (The hole saw attachment we used was brand new, so I thought it would be best to try it out on something other than the real thing.)
My dad did the hole drilling for me. Driving a 6” hole saw attachment down through plywood was not something I felt comfortable doing. My dad is experienced with this sort of thing, so he had no hesitation. You can see the process of drilling the hole in the cat house side table build video.
If you don’t want to invest in a hole saw bit or don’t feel comfortable using it, you can use a jigsaw instead (which is what Melissa did for hers). I just like how tidy and perfect the holes from a hole saw are. And, besides, it was already done. 🙂 A jig saw would also be helpful if you have a pot that doesn’t correspond perfectly to a hole saw size.
To finish prepping my piece of wood, I cut it so that there was an equal amount of wood around the circle on all four sides. Then I sanded it to remove any imperfections and splinters.


Step 2: Stain, finish, and paint the wooden holder
Since I wanted this piece to complement the other two plywood pieces in the room with exposed edges, I just finished it using three coats of Varathane water-based polyurethane in matte. You can finish yours however you like, but if you paint it, I’d probably recommend swapping steps two and three to drill the rope holes first.
I finished my pieces before drilling the rope holes because I didn’t want the urethane to clog the holes. You’ll have the same issue with paint to a lesser degree since it’s typically not as thick as urethane. You might also more easily scuff the paint job while drilling.
Step 3: Drill the rope holes.
I used my drill and a drill bit just about as big as my leather rope to drill four holes, one on each corner of the wooden holder. If you aren’t sure what size to use, err on the side of too small. You can always use a larger bit to make the hole larger.
Once you’ve drilled the holes, clean up any splinters or loose pieces.


Step 4: Glue the beads and thread the first rope.
I added the beads for two reasons: the first, to add a bit of something extra to this piece, and the second, to add some stability for the knotted ropes. And I already had them left over from a DIY felt name banner I made for Ramona, so why not?
After I’d confirmed that my leather would fit through the beads, I glued the beads directly over the holes on the bottom side of the wood piece. Once that was dry, I decided how long I wanted each piece of leather to be and threaded it up through one bead/hole and back down through the diagonal hole/bead.
This is where I used Melissa’s approach for her hanging planter by starting with one rope first. I knotted the leather once under each bead and added a few dabs of glue for extra reinforcement. You can use any kind of rope, really; just make sure it can handle the weight of your wooden holder and a plant pot after watering. (Here is a leather rope similar to what I used.)


Step 5: Thread the second rope.
Once the glue was dry on the first two knots, I did the same threading pattern for the remaining two holes/beads, but I only glued one knot, leaving the other loose. Why? Because even though I’d cut the leather straps to be completely even, knotting isn’t an exact science, and I knew it could potentially make the planter look lopsided if I got it wrong.
To solve this problem, I waited until all of the glue was dry, then I had my husband put the plant pot in and hold up the planter like it would hang from the hook. I simple held the fourth loose piece of rope steady under the planter until I found the exact spot where it was level. This is important because the leather stretches a bit, while rope probably doesn’t.
Then I dabbed a bit of glue to mark it, let it dry, and then knotted and glue the remaining rope just like the others. The initial dab of glue was to hold it exactly in place so that when I knotted it, I didn’t pull too much slack through (or vice versa). It’s also important to have the pot and plant you’ll be hanging when you do this since the weight can shift things around and pull the rope taught in different places.
And done!

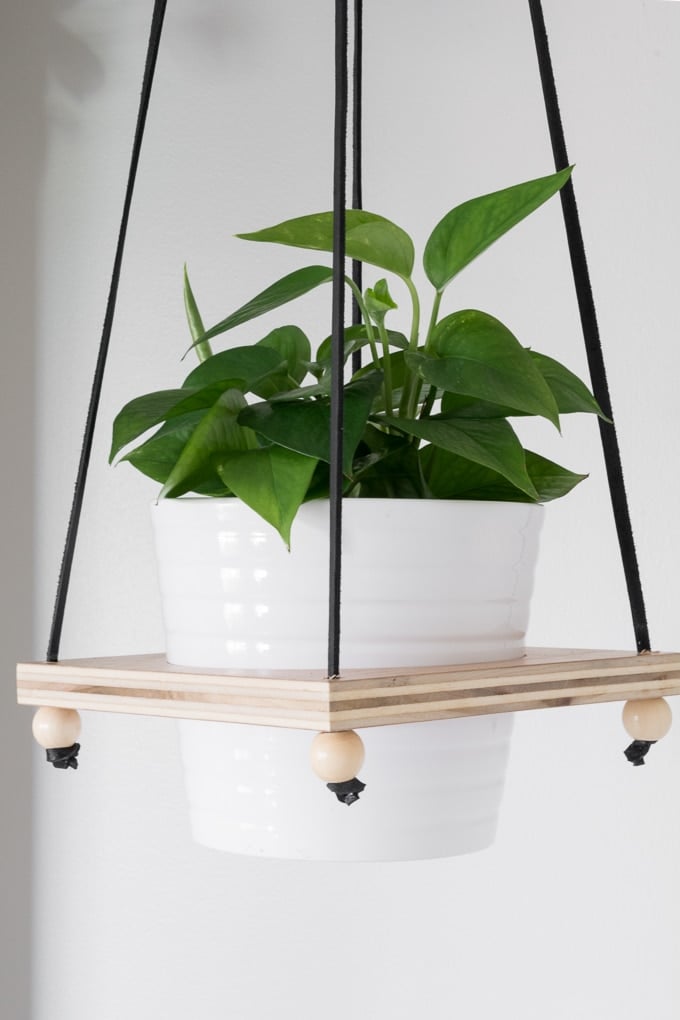
After everything was dry, I hung my wooden DIY hanging plant holder and added my pot. (Since there is no drainage in this, I built drainage into the pot. Learn how to plant in pots without drainage holes.) I wanted something trailing, so I want with a pothos plant (learn how to grow pothos from cuttings here.)
Just remember to properly hang your planter. If you’re inserting a hook into a ceiling joist, you can just use a screw hook. If you’re hanging in drywall like I was, you must use a drywall anchor rated appropriately for your weight limit.
And the finish goes perfectly the with DIY plywood planter with hairpin legs and the cat house side table, both in the same room, and both from the same sheet of plywood! If you like this project, check out my roundup of my DIY planters to help you decorate with plants, too!


Now check out all of the other 2-hour DIY projects for this month! There are some great ones!
Pin my wooden DIY hanging planter holder!


Such a beautiful plant holder!! You did a great job making it! Thanks so much for the tutorial.
Very cool, Brittany! I love this style and the easy to follow tutorial. It’s always fun to see what you have been up to.
This is super cute and so easy! it could be personalized sooo many ways!
Looks impressive. This is a great starting point for wall hangers if you don’t like the ones at the store. Hard to find them like this.
What a cute little project!
I always love your simple, clean style! Great job as usual!
This is so pretty! I love the beads you added – such a nice touch!
Oh my gosh I love this so much! I love the dark cord and the beads, such a great look!