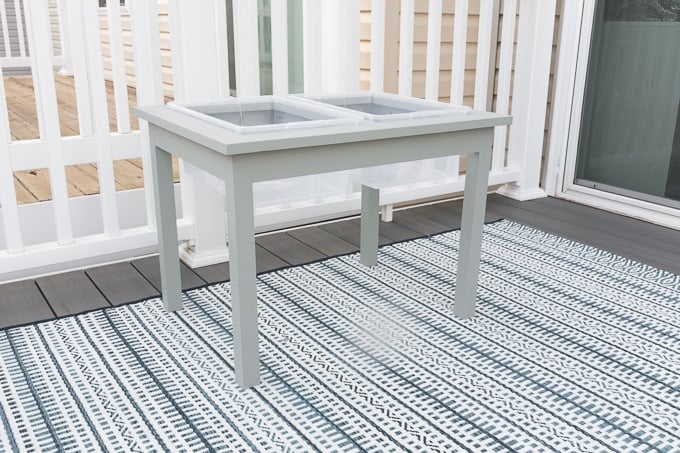
DIY Water Table for Toddlers
If you’re looking for a kids water table you can DIY, these free build plans for a DIY water table for toddlers are for you! This wooden water table is finished to hold up to the elements and look nice.
Free plans to build a DIY water table!
Hey all! I’m back at it with Anika from Anika’s DIY Life to share some more free build plans. Last time we shared the plans, steps, and a video for a DIY raised dog feeder with a modern twist.
Today we’re sharing a DIY water table for toddlers. This DIY kids water table functions great, is a lot of fun for kids, and looks amazing, too! See? 🙂

If you like this project, you might also like R’s DIY dollhouse bookcase or DIY unicorn bookends for a nursery!
Here’s what I used:
(Affiliate links below; read more about those here)
- Lumber (see cut list in free build plans)
- Kreg Jig K4
- Saw
- Cordless drill
- Orbital sander
- 1 1/4″ pocket hole screws
- Outdoor finish
- Wood filler
- Assorted bar clamps and a Kreg face clamp
- Sterlite 16 quart bins (you can get them on Amazon, but they are much cheaper at Target—that’s where I got mine)
And here’s how I made our DIY Kids Water Table!
(Remember to wear a mask and eye protection while sanding and working with wood. Do not use any tools without proper training, precautions, and/or supervision. Read my full terms of use here.)
Step 1: Drill Pocket Holes
First I drilled all pocket holes according to the build plans. I used my Kreg Jig K4 to drill the pocket holes and 1 1/4″ pocket hole screws for all of the pocket holes.

Step 2: Assemble the top
I began assembling the top by drilling 1 1/4″ pocket hole screws through the top long aprons. This creates a large rectangle that the water boxes will sit snug in.
I also added the dividing piece using pocket hole screws. Long bar clamps are especially helpful for pieces like this. The plans call for an optional right-angle clamp, which I would recommend. However, I don’t have one, so I just used the clamps I had on hand and a right-angle and it worked fine (even if it was a bit of extra work!).


Step 3: Begin Assembling Bottom Apron
This step also includes the legs because they are attached to the bottom apron. What you make in this and the next step is what the top apron sits on top of.
Again I used bar clamps and a right-angle to position and attach the long bottom apron pieces to the legs. Once you do both, you’ll have two “U-shaped” pieces (second pic below).
You’ll then take one of those U-shaped pieces and attach the remaining two shorter bottom aprons (last pic in the series below).


Step 4: Finish legs and bottom apron
I attached the piece I was left with in the previous step to the other U-shaped piece. I did this using bar clamps. Wood can something be a bit wonky, even when you buy the nice stuff.
You’ll see in the video that one of the pieces didn’t line up perfectly due to a slight bend in the wood. A bar clamp helped me get everything to line up perfectly while I drove pocket hole screws through to finish off this base.

Step 5: Attach base to top apron to finish the DIY water table
I attached the base to the top apron by flipping everything upside down, clamping everything in place on my workspace, and driving my pocket hole screws down through the pocket holes I’d already drilled.
I also relied heavily on the clamps for this step. You’ll see in the video that the bottom was a bit wonky when I set it down on the top apron. Clamps helped me line everything up perfectly, and the pocket hole screws are more than strong enough to hold everything in place.
Once I’d attach the base to the top, I attached the support piece under the top divider (second pic below).


Step 6: Sand and Finish the Table
As a final step, I gave the entire piece a thorough sanding with my orbital sander. I wanted all of the joints to look seamless. This process also helped smooth over any rough spots and splintery edges.
I also filled visible pocket holes with wood filler. To be honest, I worried about filling only the pocket holes on the outside of the bottom apron. I loathe filling pocket holes because at that point I’m just so ready to be done with a project! So I left the interior ones on the bottom apron open and painted over them.
Once I was done sanding, I wiped the piece down and finished it off with Behr Premium Waterproofing Stain & Sealer in Harbor Gray. This is the same finish we used on the shed in our backyard last year, so I wanted to use what I had already. It also has help up incredibly well to the elements, so I figured it’d be great for a toddler water table!
Once the paint was completely dry (this brand says it repels water in 4 hour, so I gave it about 6 hours to be safe), I added the bins. If you want to follow these plans, you need to use these exact bins. Of course you can use these plans as inspiration for your own bins if you’d like. 🙂


For more kids projects, check out my dollhouse bookcase build, my modern kids table and chairs, Ramona’s big girl bed, this toddler step stool, Lego table with storage, and Ramona’s nursery!


And here’s the finished DIY water table!
It turned out perfectly, don’t you think? It looks sharp! And the way the table is constructed, you can put the lids back on when you’re not using it. I also think this would be a nice play table for sand, beads, or anything else you’d like to use.
My daughter absolutely loves it. She lit up when she realized she could splash around in the water, and we got this one done just in time for our first 90 degree day of the season!


GRAB THE FREE BUILD PLANS HERE!
Pin our DIY water table for toddlers!


Oh my goodness this is adorable! Also love the feline photo bomb.
If we’re outside, BB cat is outside loungin’