
Slatted Outdoor Dining Table Build
This post shares my slatted outdoor dining table build. DIY 2×4 patio furniture is an easy way to make affordable yet stylish pieces for your home, and customizing them with wood like ipe is a nice way to make them unique.
Slatted Outdoor Dining Table Build: DIY 2×4 Patio Furniture
It’s time for the August iteration of the At Home DIY challenge, and the theme is building something with 2x4s! I’ve got a slatted outdoor dining table build on the docket—I’m using 2x4s for everything but the slatted top, which I’m using ipe for.
I wanted something that was super hard and resilient. The pine we had on our outdoor dining table last year peeled and fried in the summer sun despite being finished with spar urethane. So I decided to up the ante for this build and go with something strong—ipe—which is a very dense hardwood. What do you think?
We also needed something to help stabilize our giant patio umbrella. Our deck is pretty much unusable without it since it gets so miserably hot and sunny, and the giant base filled with sand wasn’t cutting it. We needed something to stabilize it more. We live in a wind tunnel, and it was blow over (even when it was shut) almost daily!
Here’s what I used:
(Affiliate links below; read more about those here)
Lumber
- 2×4 pine for the legs and aprons
- Ipe for the slatted table top—I got mine at a local lumber shop
- For the full plans and a detailed cut list, sign up for the plans!
Tools
Finishing
- Primer
- Outdoor opaque white stain
- Teak oil
- 320-grit sandpaper
- Rags for wiping and oil application
Miscellaneous
- 2 1/2 inch pocket hole screws
- Assorted bar clamps
- Small L-brackets and 3/4″ screws
- Measuring tape and pencil
- Safety gear
And here are the slatted outdoor dining table build steps:
Always take the proper precautions and safety measures before working with any tools or materials. Wear safety equipment and work with a professional to complete projects when necessary. Read my full terms of use and disclosure for more. Happy making and stay safe!
Step 1: Cut and drill pocket holes
First I cut all pieces according to the cut list. Here is a link to the Dropbox folder with all of my free printable plans.
Then I drilled pocket holes on the ends of all base and apron pieces except for the legs. I sanded all of these pieces very thoroughly using my orbital sander to break off any rough spots and just generally clean these pieces up. 2x4s need some love to look their best.

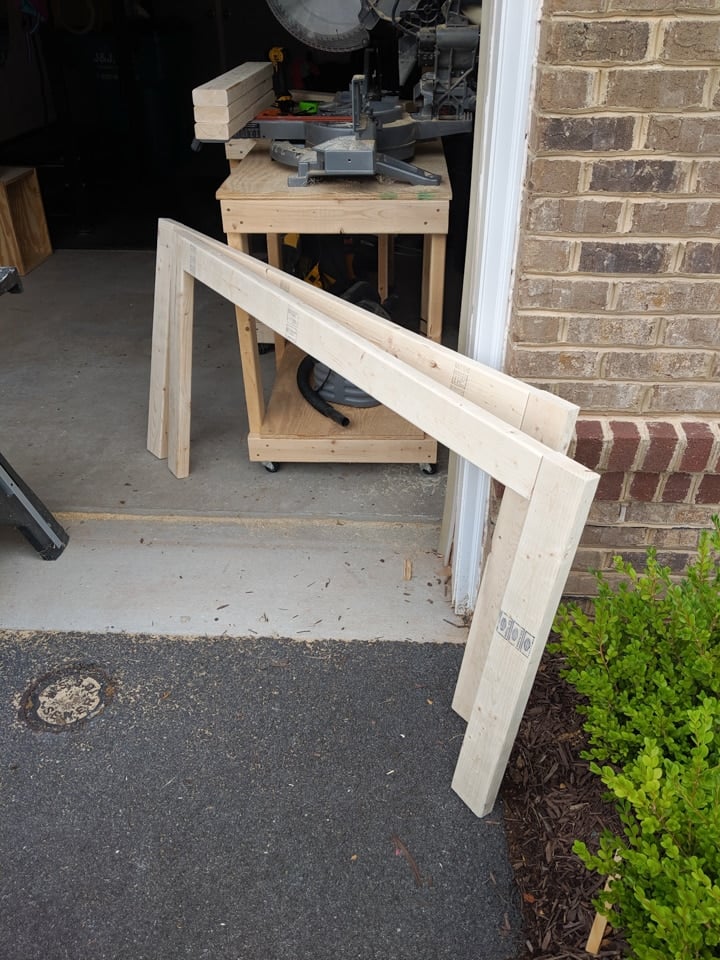
Step 2: Begin assembly, patch, prime
Next I attached each leg to the ends of the longer apron pieces. I put the pocket holes on the inside, so I made sure the prettier sides of the 2x4s were facing out.
I also primed these pieces. Then I realized I should probably patch the knotty hole areas on the 2x4s to make them look better, so I added some wood filler to those areas as well. Once it was dry, I sanded it smooth. I recommend patching before priming 😉


Step 3: Finish assembling base and paint
Once all of these pieces were patched, primed, and dry, we assembled the table base as follows. We actually had to bring up the pieces like this and assemble in our dining area, otherwise we wouldn’t have been able to get the table base upstairs.
And once assembled, I gave the base two coats of Behr opaque stain and sealer in white. This really brightened up the primer coat, but it’s hard to tell in these photos. I love this stain and have used it in gray on a number of things in our yard. It basically looks just like paint, and since it’s opaque, you can use a primer under it.


Step 4: Finish the ipe
Next I finished the 5 ipe boards I had for the table top. The wood is really beautiful on its own and would do fine outdoors untreated. However, if you want to elongate its life and bring out its true beauty, it’s best to apply some oil.
You can see the difference between the untreated slat and the oil slats is astoundingly beautiful! I just gave them a light sanding by hand using 320-grit sandpaper before applying the oil using a rag.


Here’s what they looked like laid out on the table base. I wanted to get an idea of spacing. I just eyeballed the spacing between the boards, attached the two boards on the ends first.
If you were using more than five boards or your table was larger (especially if it’s wider), I would recommend using spacers to ensure everything stays evenly spaced.

Step 5: Drill hole for patio umbrella and attach boards
We used a hole saw bit to drill a hole in the center of the middle board for our giant shade-providing patio umbrella. Then we attached the ipe boards on the underside using L-brackets.


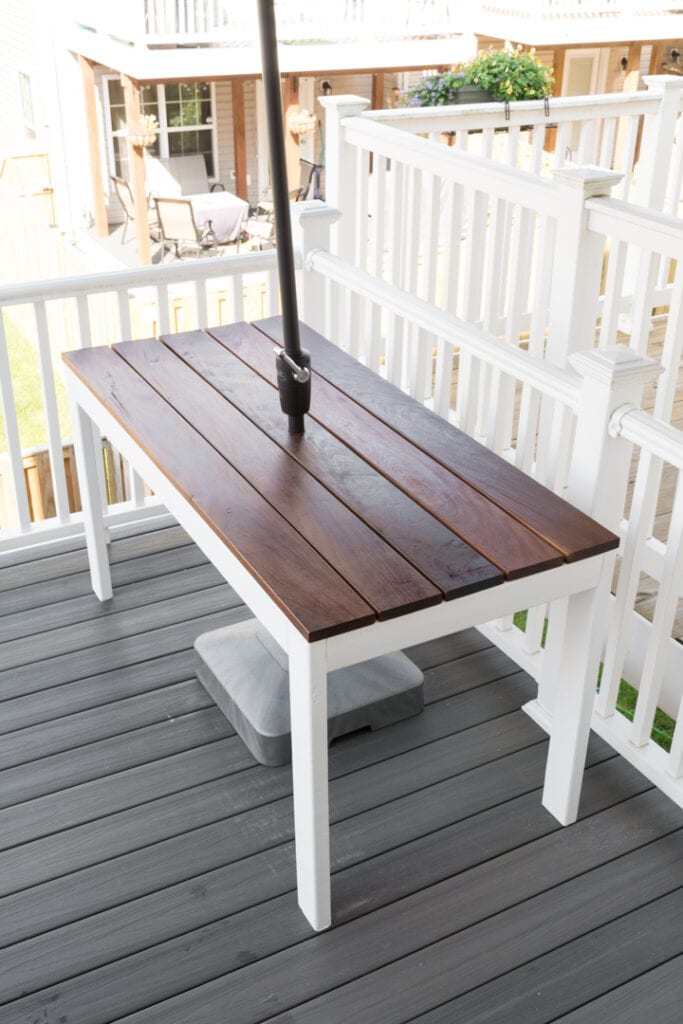
And here is the finished patio table!
I love it. Our beautiful table/umbrella containment device is the perfect little addition to our deck. Now we actually have somewhere to set things while Mo is playing with all of her things on the deck, and we have plenty of shade so we don’t fry. Win-win-win. Grab the full build plans for this table below!


Pin this!


Brittany, Your projects never dissappoint! This table is beautiful and I would love to build me one like it.
Brittany, I just love this table! I’m a sucker for white and stained pieces. That exotic wood on the top really elevates the entire build ??
What a gorgeous outdoor dining table! I adore it!! Great job!!!
It’s beautiful Brittany! Love how the ipe wood took the stain, so pretty!
That oiled top is so beautiful!
This looks so professional! I love that you stained the top, it looks so pretty.