Reviving Faded Black Clothes With Dye
How to revive faded black clothing
Today I am sharing a project I’ve been meaning to do for a LONG time. I have actually had the bottle of dye in my closet for a few months, I just haven’t gotten around to it.
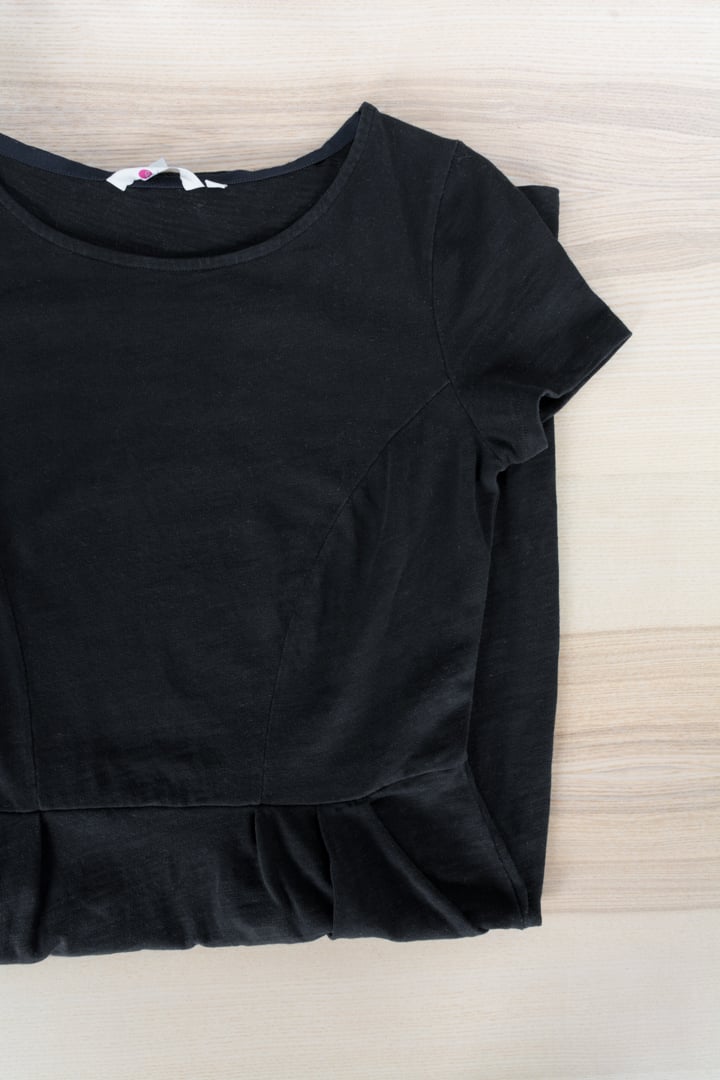
I have a favorite dress from Boden, my favorite place to shop for work dresses. They are expensive, but they hold up very well. Great customer service, great products. And every work dress I buy from them is machine washable. This is super important for me because I’m down to almost no dry clean only clothes.
My favorite dress from Boden is a black 100% cotton short-sleeved dress. I typically don’t love 100% cotton because I like a bit more stretch and silkiness to my fabrics, but this dress is perfect. It can be paired with pretty much anything for work—a cardigan, a blazer, or nothing at all.
But after a few years, it is faded. I don’t have a huge work wardrobe—about 5 years ago I drastically reduced the size of my closet, including both off work and work clothes. Instead I focused on buying pieces that I can wear and rewear. This has served me well…except fabrics fade! Especially black. And I love wearing black, because it goes with everything.

Before getting started…
I have done some dyeing projects here on the blog before, but most of them were for fun stuff like ice dye reusable napkins. And I also did arguably one of the hardest dyeing projects there is—dyeing a white item jet black, a throw rug. I used cold-water procion dye for that project because I did it in a large tub.
But for this project, since it’s smaller and easier to manage, my faded black clothes dye of choice is Rit All Purpose Liquid Dye in Black. Rit dye is an old staple and is a fabulous choice for dyeing natural fabrics like cotton, linen, wool, silk, and ramie.
If the garment you want to dye contains more than 35% synthetic material, you should use Rit’s dye for synthetic fabrics called Rit DyeMore. Rit DyeMore is specially made for synthetic fabrics like polyester, acrylic, acetate, plus blends that contain those fibers.
Also, when using black dye, don’t use a fiberglass or porcelain sink. A stainless steel sink is the best option. Or a container you don’t care about getting stained. Always better to be safe!
And if the item you’re trying to dye has a pattern/logo, the dye color you use will mix with the existing colors to create new colors. Also, bleach damage will make dyeing difficult. Never bleach before dyeing. Use a dye color remover instead.


Supplies & steps to dye
(Affiliate links below; read more here)
- Rit All Purpose Liquid Dye in Black (also available in a powder form)
- Rit ColorStay Dye Fixative
- Stainless steel sink
- Large pot, water, and stove
- Salt and dish soap
- Stirrer
- Disposable rubber gloves
Step 1: Heat water & measure dye
First I put a large pot of water on the stove to heat it up just a bit more than my sink could. In the meantime, I added about half of the amount of water I needed to my stainless steel sink.
For sink dyeing the bottle called for 1/2 a bottle of the liquid dye per each 3 gallons of water. The bottle is 8 ounces, so that means 4 ounces per 3 gallons of water. I didn’t need that much, so I used 2 ounces of dye and 1.5 gallons of water. This converts to 1/4 cup of liquid dye and 24 cups of water.
I used about 12 cups of hot tap water and 12 cups of water that I’d heated a bit extra on the stove—but I didn’t let it reach the boiling point. I mixed the 24 cups of water and the 1/4 cup of black liquid dye in the sink. Plus a dash of dish soap and some salt to help with even and vibrant dye dispersion.
Note: You can convert all of these measurements for whatever you need with a simple Google search! Lifesaver for someone who can never remember conversions!


Step 2: Wet and submerge the item
I then put on my disposable gloves and immediately wet and submerged the entire dress I was dyeing. I used the stirrer to make sure all parts of the dress touches the dye and stirred it for about 10 minutes.
This is a critical time period in dyeing—the first 10 minutes. Since the water was so hot, I didn’t want to stick my hands in yet. The stirrer helped a ton.
Occasionally I pulled the dress up and out of the water just to reposition it in the dye bath. But mostly I relied on the stirrer for the first 10 minutes. After the 10 minutes, I let the dress sit for 5 minute periods between stirring.
Rit All Purpose Dye recommends 30–60 minutes for a sink or bucket dye bath. I did about 40 minutes total because I was just dyeing a faded black item black again. If I were dyeing from light to dark, I’d do the maximum time.
They also recommend using 1 cup of salt to enhance color when dyeing cotton, rayon, ramie, or linen fabrics or 1 cup of vinegar when dyeing nylon, silk, or wool fabrics. And 1 tsp of dish soap to promote level dyeing.


Step 3: Drain and rinse the dye
After about 40 minutes, I drained the sink and began running cold water to rinse the dress out. I did this for about 5 minutes, constantly soaking the dress and then squeezing out the water to see how dark it was. During this step, I also got another pot of about 12 cups of water heating on the stove.

Step 4: Apply ColorStay Dye Fixative
Once the water was running mostly clear, I repeated the dye bath step again where I added 12 cups of hot tap water with 12 cups of water heated on the stove (but not boiling).
I added ColorStay Dye Fixative to help lock in color and prevent bleeding. The ColorStay Dye Fixative ratio is 4 ounces of fixative for every 3 gallons of water. Wear rubber gloves just like when you’re dyeing.
I stirred the dress in this bath continuously every 5 minutes or so. Don’t freak out if the water begins darkening. This is just the stray dye coming off the item. It’s a good thing—it’s not bleeding into your other clothing!
This dye fixative reduces bleeding and fading and enhances. It works on cotton, linen, silk, wool, ramie, and rayon. For best results, use immediately after dyeing, before rinsing completely and washing.

Step 5: Drain, rinse again, & dry
After this, I drained the sink again and began rinsing the dress out. Honestly, there wasn’t much to rinse. I think the ColorStay Dye Fixative does an awesome job of setting the dye.
The water was running completely clear almost immediately. When I was sure it was running clear, I ran the dress on a cold water laundry cycle with other dark items just to be sure. Then I hung to dry as normal. The dress looks awesome, totally revived to its former glory.


Pin this!