How to Build a Trellis for Vines
This post shares a tutorial to teach you how to build a trellis for vines. Making a modern garden trellis is easy and can add something extra to your outdoor space without spending a lot.
How to build a trellis for vines and my modern DIY trellis!
Sharing a quick but high-impact DIY today as part of the At Home DIY challenge for June! The theme this month is “build it cheaper than buying it furniture challenge.” I’m not doing furniture exactly…I’m doing a trellis!
It’s a DIY trellis for vines with a more modern twist. I didn’t really have an exact plan going into this project, just a vision. I am so pleased with how it turned out, though!
Here’s the before shot. (The fence looks dark and dirty because I’d just watered the garden.) We really need to pressure wash and stain/seal the fence, but we’re putting it off until next spring. There just isn’t enough time for everything!

My next best option was to improve our fence view from the deck by creating a large trellis that something beautiful could vine up. And it cost me about $20, but is definitely less than I’d pay for something this big and beautiful at a store. Plus, as with all DIYs, I got to make it exactly what I wanted it to be. 🙂
One of my inspiration pieces was my friend Jamie’s huge DIY trellis she made. But even this simple one at a local nursery was about $30.

So here’s what I used—
(Affiliate links below; read more about those here)
- 1×2—keep the cost down by using 1×2 furring strips instead of the nicer stuff, but be warned that furring strips can be really wonky, so pick the straightest ones you can find in the pile!
- Various 6- or 8-ft pieces from the moulding section—here, here, and here are a few examples of what I mean.
- Good ol’ fashioned hammer and nails—that’s right, I ran out of nails for my nail gun the day I wanted to do this project, so I took it old school.
- Optional: Glue
- Measuring tape and pencil
- Finish for outdoor use
And here’s how to build a trellis for vines!
(Safety first! Remember to wear a mask and eye protection while cutting and sanding wood. Do not use any tools without proper training, precautions, and/or supervision. Read my full terms of use here.)
Step 1: Decide on size and build the trellis’s main frame
First I measured where on my fence I wanted to trellis to go. I decided on a rectangular shape of 3 feet by 4 feet with two vertical support pieces in between. This is how I figured out how much 1×2 I needed to buy.
I assembled the main frame by nailing all four vertical pieces on below the horizontal pieces. This is to create more separation between the fence and the trellis. I used three small nails and a bit of glue for each corner. It’s very sturdy.


Step 2: Decide on layout.
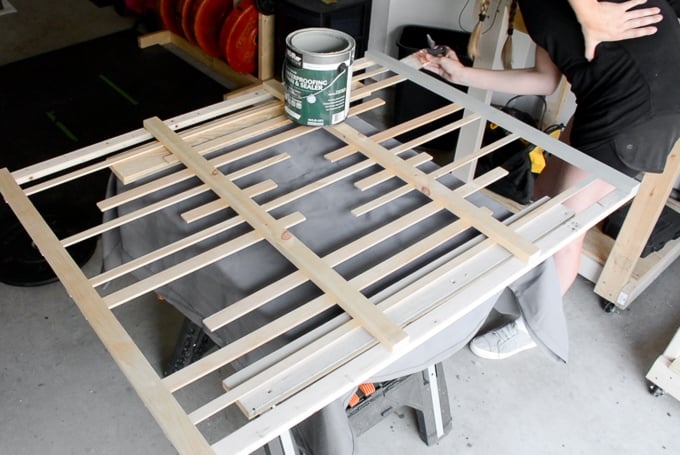
Next I started playing with the design I wanted to create. Since I wanted this to have a modern horizontal slatted look, I started by cutting a few longer pieces and laying them on the frame.
Here’s the rough layout I decided on. The pieces are just laid out so I could get a better idea.

Then I filled in the smaller pieces until I had a design I really liked. This doesn’t have to be exact, though I did mirror the same pattern on the top and bottom. I also used every scrap, even the 5 inch pieces.
To attach these pieces, I just measured and nailed them into place. The ones that attached to only one vertical piece got a few nails. The ones I attached to multiple pieces just got one small nail in each vertical piece. I didn’t use glue on any of these.


Step 3: Finish for outdoor use and hang.
I finished my trellis with a Behr opaque outdoor stain—the same one we used on our shed last year. I used it recently on Ramona’s DIY water play table as well. It holds up super well, and I only needed one coat.
To hang this, we just drove two screws back through one of the vertical pieces into a fence post. We were planning to do more, but it seems really sturdy as is, so we figured we didn’t need to make any more holes.

It looked so good that it made the cucumber trellis next to it look like garbage…so I decided to stain that to match! It was in rough condition after being left out unfinished for a year, so I figure I can get another year or two out of it this way.
What do you think? I planted a white mandevilla vine to grow up this trellis. It’s not that big, but some stems are long enough to start training up the trellis, so I went ahead and did that. I’m hoping my fence looks really beautiful here in a month or so! I’ll update with pictures soon.


DIY trellis update—how has it held up?
I love popping in on older posts to do updates. Sometimes I get emails from people asking things like, “yeah, this is cool…but did it last?!” Sometimes the answer is no. A lot of times the answer is yes. And today is one of those times!
My trellis has made it through two full summers of blazing Maryland heat and sun. The finish I used has held up really well and hasn’t needed any touchups as well. The piece has also remained completely sturdy. We leave it up through the fall and winter, too, because we don’t really have anywhere to store it.
We only took it down to pressure wash the fence and then stain it. Then just hung it right back up where it was before. I’m still deciding what I want to plant here for its third summer, but we sure do love having it in the garden!


Like this? Check out our tiny backyard for ideas, our DIY AC unit screen, our DIY paver coffee table and a matching paver side table, some vertical and container gardening ideas, and beautiful small outdoor spaces.
Pin my post about how to build a trellis for vines!


Such a great project! And so much cheaper and way more stylish than what they sell in the stores. When we built a simple trellis years ago we didn’t initially use two nails at every junction. The entire thing almost folded up like one of those 70’s accordion cup holders LOL
Brittany, I love the modern design of your trellis. You’re not going to find anything like it at a garden center, that’s for sure! And the video was a nice touch, too.
Your trellis looks amazing and you saved yourself money. I love the modern look that it adds to your outdoor space.
woah I love this Brittany! great job
I love how simple this trellis is, thanks for sharing!
I absolutely adore the trellis you built. It’s so beautiful!!!
It looks great! I love the design you came up with!
These look fantastic! So much nicer than the ones you can find in the store 🙂