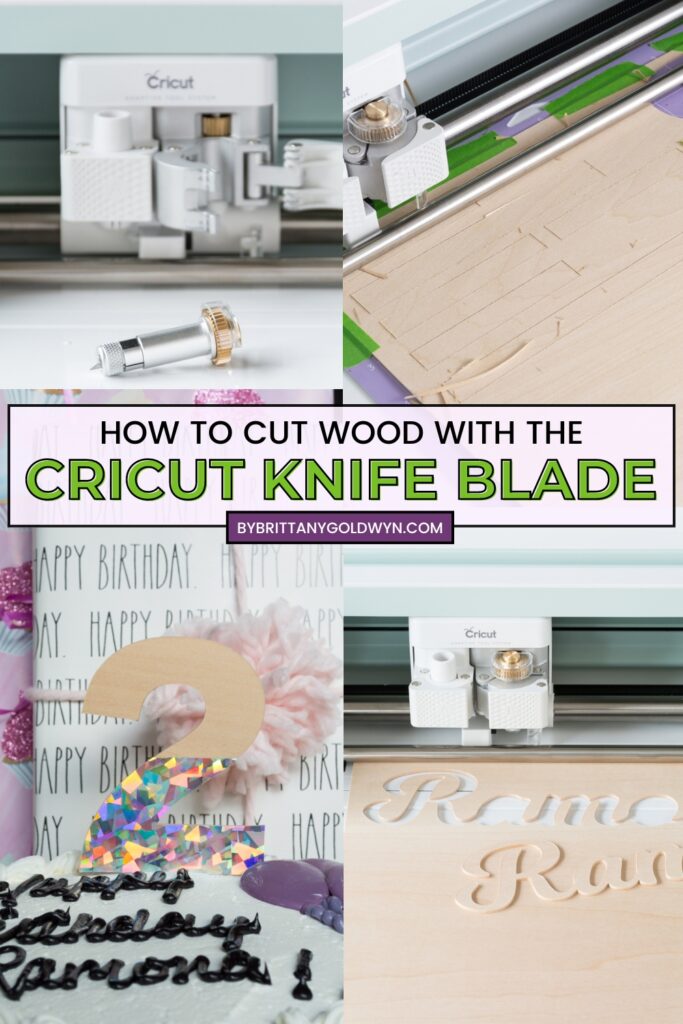
Using the Cricut Maker’s Knife Blade to Cut Wood
This post contains affiliate links.
All about using the Cricut Maker’s Knife Blade to cut wood!
Today we’re talking all about using the Cricut Maker’s Knife Blade to cut wood! I love this option because it feels like where all of my worlds meet: woodworking, crafting, and DIY home projects. 🙂
- What machine can I use the Knife Blade on?
- What can the Cricut Knife Blade cut?
- Balsa wood vs. basswood
- Can I cut detailed images with the knife blade?
- How long does the Knife Blade take to cut?
- What if the Knife Blade doesn’t cut all the way through?
- Preparing to use your Knife Blade
- Using the Knife Blade to cut wood
What machine can I use the Knife Blade on?
The Knife Blade is a blade specially designed for use with the Cricut Maker—the only Cricut machine you can use the knife blade on. I have and love the Cricut Explore Air 2. But the Cricut Maker has some significant differences that really take things to the next level.
Both the Maker and the Explore Air 2 machines are great. But the Maker kicks it up a notch. It is a commercial grade machine for serious crafters and cuts the most materials out of all Cricut machines—hundreds of materials from delicate paper to leather.
The Maker’s Adaptive Tool System is a professional cutting technology that isn’t available on other machines. This system controls the direction of the blade and the pressure of the cut based on your material. It does the thinking for you.

What can the Cricut Knife Blade cut?
If you’re wondering what you need the Cricut Knife Blade for, here’s a list. It’s typically just thicker materials, for obvious reasons. More to cut through = the need for a knife. So even if you get the knife blade to cut wood, it’s a handy tool for other things, too.
- Balsa wood in thicknesses of 1/32in, 1/16in, and 3/32in
- Basswood in thicknesses of 1/32in and 1/16in
- Cricut Chipboard in thicknesses of 1.5mm, 2mm, and 3mm
- Craft Foam in thicknesses of 1.5mm, 2mm, and 3mm
- Leather—see a list of types you can cut here
- Matboard, 2 ply
Balsa wood vs. basswood
Balsa wood and basswood are similar woods. They are both very lightweight and are used in a variety of different crafting and modeling projects. Balsa has a high strength-to-weight ratio and can be bent by soaking it in water and then holding it in place as it dries. (Note that basswood can also bend, and you don’t have to soak it in water.)
Balsa is the less expensive of the two and can be found easily in craft and hobby stores. Since you want to avoid knots in your material, it’s best to take a peek at balsa in person before buying it. Or, at the very least, read the reviews online.
Basswood, on the other hand, is not as prone to warping and is denser and more durable than balsa. It can’t be crushed nearly as easily as balsa can—it’s less fragile. Basswood has a smooth, even wood grain that the Knife Blade deals with very well.
You can cut either wood on the Maker. Whichever you choose, just make sure it doesn’t have any knots. If a piece as a knot, make sure the knife blade will not have to go through the knot when cutting your pattern.
Luckily Cricut has a line of 1/16in basswood with a lovely finish designed specifically for the knife blade. Obviously, since it’s Cricut-brand basswood, you’ll probably get the best results using it. But the tips below go for either wood!

Can I cut detailed images with the knife blade?
According to Cricut, the knife blade is ideal for cuts with low to moderate detail. That means that cuts should be no smaller than 3/4in—including interior cuts. Areas smaller than 3/4in may separate, fall apart, or be crushed due to the multiple passes and pressure required to use the knife blade.
These guidelines on how you should size your cuts come directly from Cricut. Proceed at your own caution when cutting projects with thinner or more detailed areas. 🙂
- Max size: 10.5” x 11.5” or 10.5” x 23.5”
- Min: 0.75” x 0.75” (includes interior and exterior cuts)
- Width of cuts should not be smaller than the diameter of a pencil (aka .75”)
- Make sure all cuts are at least .25” away from the edge of the wood (the blade will probably be damaged if it crosses the edge of the wood)
- Smaller, more intricate images may not cut well—shoot for only moderately complex cuts and monitor the cutting process

For more Cricut, see my Cricut Joy Xtra Review, my Guide to Using the Cricut Explore 3, and my article What is the Cricut Venture?
How long does the Knife Blade take to cut?
Unlike paper and vinyl, your Cricut Maker doesn’t cut thicker materials like wood in one pass. Instead, your machine will take multiple cut passes, so cutting thicker materials takes longer.
When you select a material to cut and get everything loaded, Design Space will give you an estimate of how long the cut will take, including the number of passes.
However, remember that time estimates can vary depending on your project. Make sure your computer doesn’t get bored and go to sleep while your machine is cutting! Cricut also suggests removing small pieces as the machine cuts to avoid them coming off and interfering with the knife blade.
Because of all of these reasons, you can’t use fast mode cutting with using the knife blade. This project took about 20ish minutes and about 14 passes to cut out. The material was the Cricut-brand basswood.

What if the Knife Blade doesn’t cut all the way through?
Once all passes are done, do NOT immediately remove the mat from your machine. Removing the mat will cancel the project, and you won’t be able to do any additional cut passes if you need to.
Check to ensure all cuts are good to go and that you don’t need to run the material through for more passes. You can inspect your cuts by using a weeding tool to gently pick at the cut areas.
Make sure cuts have gone all the way through the wood. If you find an area needs to be cut more and can’t be delicately separately with a small hand-held tool, simply click the Go button in Design Space to begin another pass.
Be warned that cutting too deep can go down through your mat, so use your best judgment on whether another pass is needed. A small knife tool might be easier to use if there is only a small amount still attached along the cut lines.

Preparing to use your Knife Blade
Now that you know a bit about using the Knife Blade to cut wood, there are three steps you need to take if this is the first time you’re using it on your Maker. I’m going to walk you through those steps now to help ensure your first project is a success.
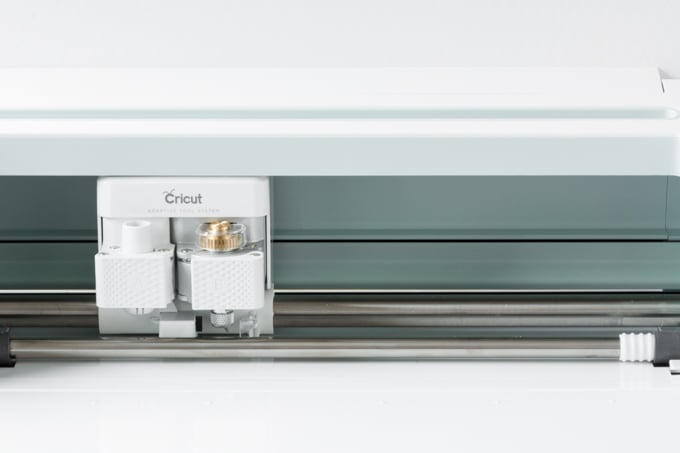
Step 1: Move the Star Wheels
The materials you’ll cut with the knife blade are thicker than the paper and vinyl products you might normally cut on your Maker. To ensure you provide proper clearance for the thicker material, move the star wheels (the small white rings) on the Maker’s roller bar all the way to the right.
These wheels are an important part of helping materials stay in place while you’re cutting, but they can leave track marks on thicker materials. (Don’t worry, using a strong-grip mat and a tip in the next step helps keep your materials in place without the star wheels.)
If it’s your first time moving your star wheels, you might have to use a bit of pressure. Also, when you move the star wheels all the way to the right, they will still overlap about 1in on your mat. Therefore,
Cricut recommends cutting about 1in off of the right side of your material so it won’t interfere with or get caught up in the star wheels. Make sense? The Cricut basswood is actually only 11in by 11in, not 12in by 12in, for this reason.
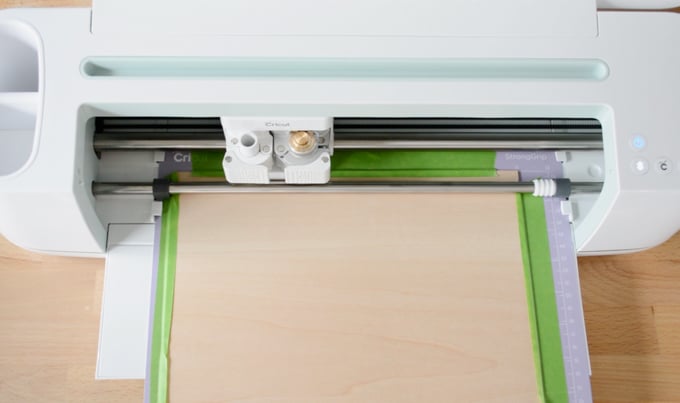
Step 2: Prepare your material and mat
That brings us to step 2: how to prepare your material and mat. I always try to cut down material before cutting to minimize waste. Make sure the material you’re cutting is not wider than 11in because of the issue with the star wheel overlap outlined in the previous step.
Use a purple StrongGrip mat and painter’s tape to tape the material down on all four sides. Make sure the tape doesn’t overlap into any of your cutting areas. Cricut’s mats are typically pretty fool-proof without any additional adhesion. But the knife blade cuts with 10 times more pressure, so the tape helps keep everything in place.
Painter’s tape is the best choice because it has a light adhesive. It’s a delicate balance between finding something that will help your material stay in place but won’t leave any sticky residue on your project!
You also don’t want to damage your material using a tape that is too strong. Here are a few other tips for preparing your material and mat:
- If the material bows at all, place it on the mat in the position that ensures the curved areas go down toward the mat.
- Apply firm, even pressure across the material to ensure it is evenly adhered.
- Mirror images when cutting so that if you end up with any uh-oh spots, you can just flip the cut wood over.
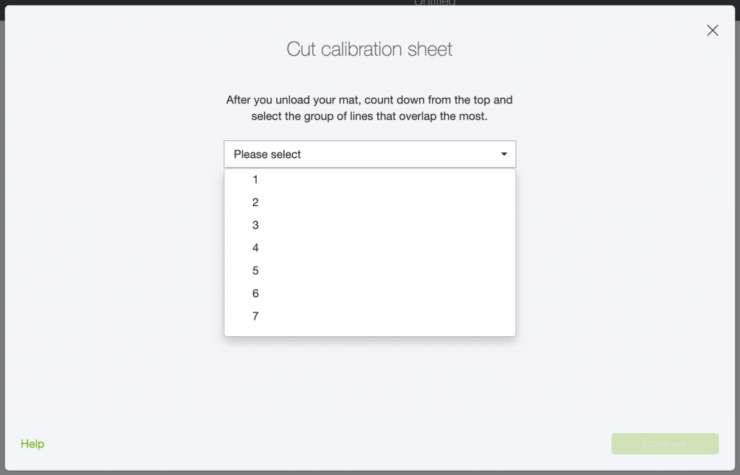
Step 3: Calibrate your Knife Blade
If it’s your first time cutting with your Knife Blade, you must calibrate it. This process is essential because it teaches your Cricut Maker that the knife blade housing is now attached to the machine—it needs to know how to use what’s attached to it. You can’t cut with the knife blade if you haven’t calibrated it first, so let’s get to calibrating.
In Design Space, select account menu, Calibration > Knife Blade. Attach the knife blade to your machine, insert a piece of plain white paper on a mat, and click Continue. Press the Go button to begin.
As your machine begins calibrating, it will cut seven sets of lines with some overlap. When this process is done, simply remove the mat from the machine and find the set of lines with the best overlap. “The best overlap” just means that the cuts appear as a single cut line—there is no gap between lines.
Count which set this is (from 1 through 7) and select the appropriate response in the prompt on Design Space. And you’re done!
Using the Knife Blade to cut wood
Now you know all of the critical information about the knife blade’s capabilities, and you know how to set up your machine, material, and mat to use the blade. So let’s dive into using the knife blade on an actual wood project.
Step 1: Prep the machine and materials
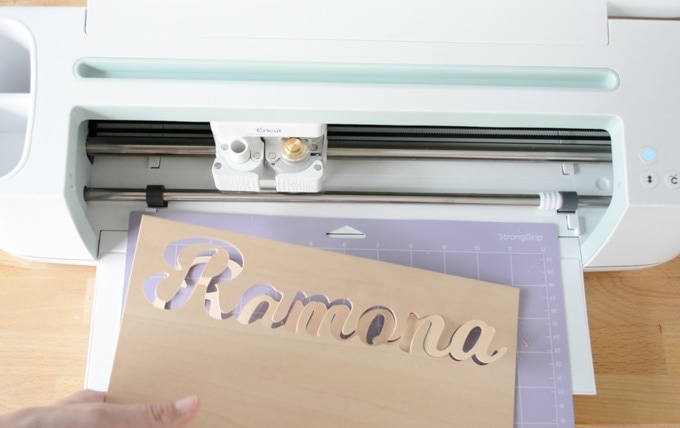
Today I’m cutting a simple cut file I made myself by uploading it to Cricut Design Space and removing the negative space. It’s just a brush script of my daughter’s name.

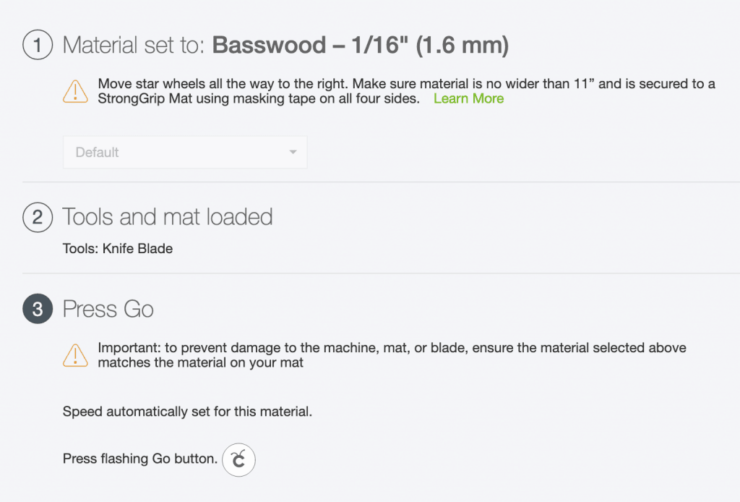
After I’d followed all of the previous steps to prepare my machine and knife blade, set up my material and mat, taped everything down, and load my cut file in Design Space, I started cutting. Here are the warnings Design Space gave me just before starting to cut my project. You can see that it reminds you of all the things I’ve outlined in this post.
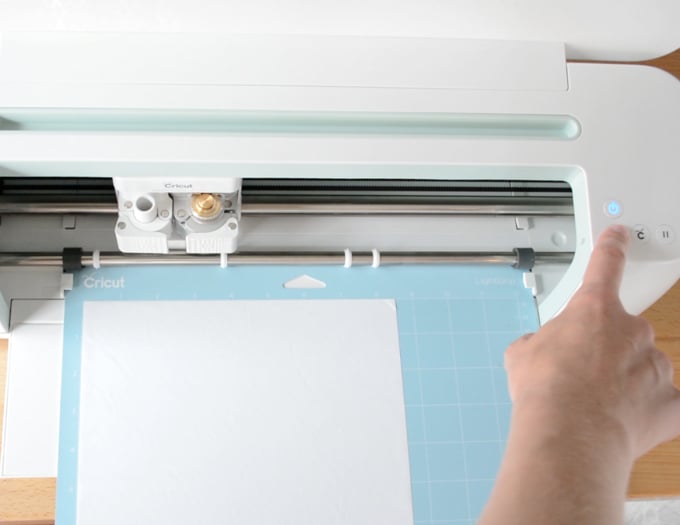
Step 2: Start the project
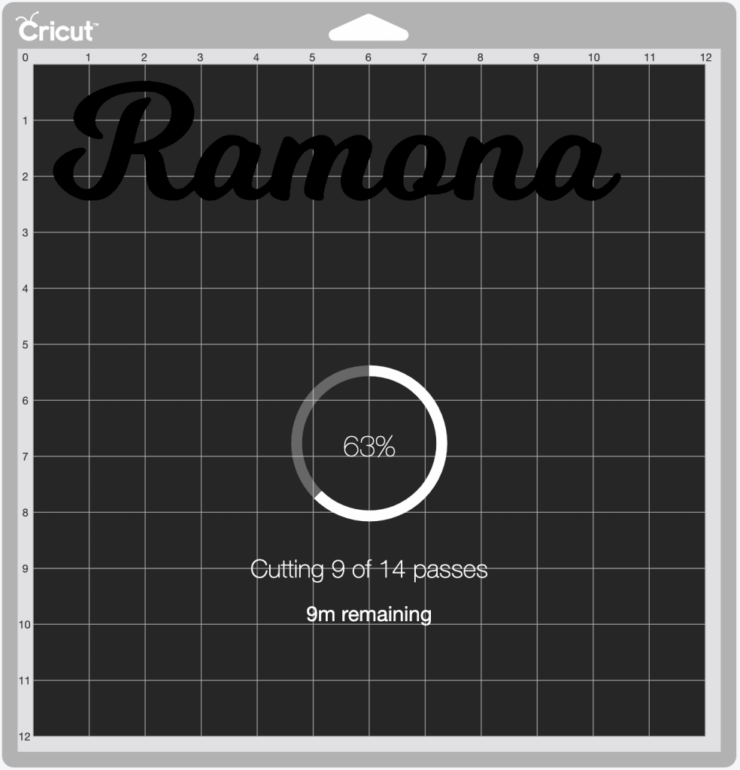
Next I began cutting. This is the first screen I got. It estimated 14 passes and was on the first pass, which was only about 2% of the way toward being done with cutting the file. Once this pass was done, Design Space gave me an estimate of how much time was left for the cut.
Step 3: Finish the cut
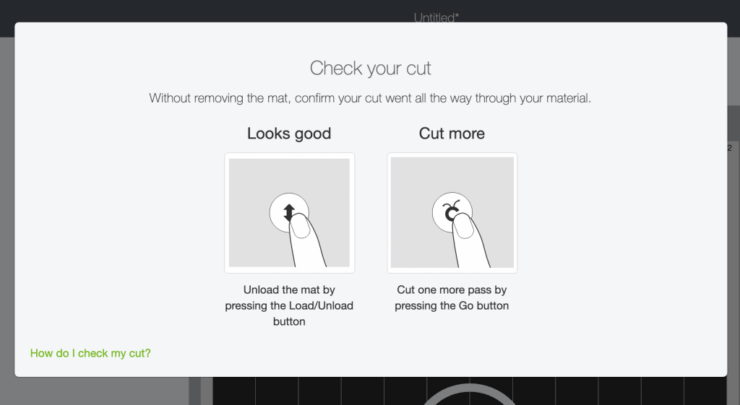
All of the passes took about 20ish minutes to complete. I checked periodically while I went about my business. Once it was done, I got this screen on Design Space, which asked me to make sure my cuts were good before unloading the mat.
I used a weeding tool to gently lift the “a” at the end of the cut to see if it made it all the way through. It lifted with ease, so I took a gamble and assumed the rest of the project was good. Then I gently removed the outline.
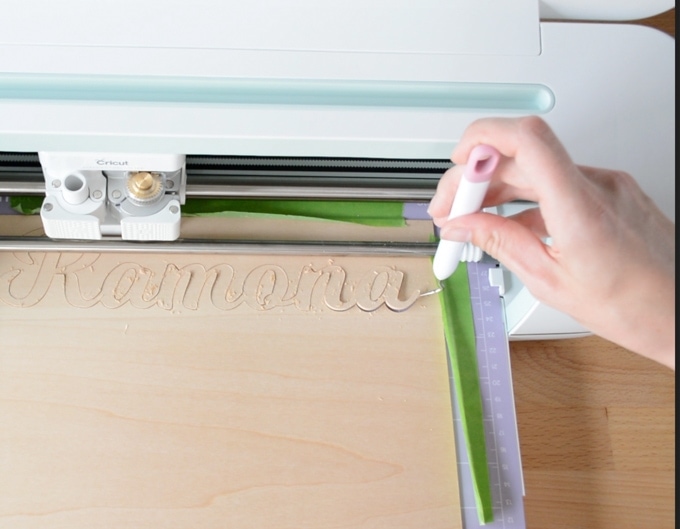
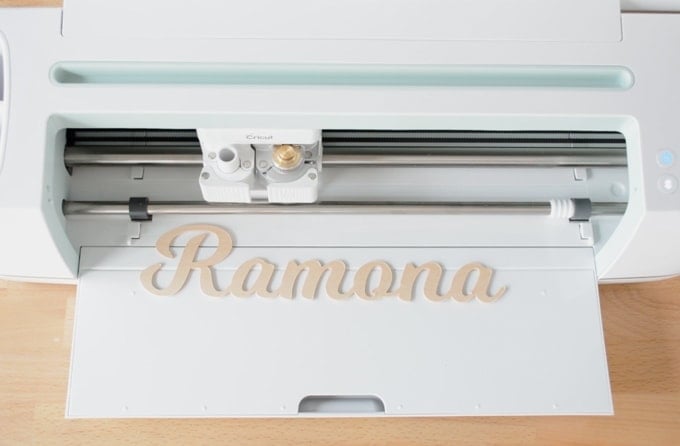
Beautiful! And this is before doing any sanding at all. Please remember that you need to be very very careful with handling cut basswood with connections of this size. It can break easily.
And that’s about it! There can be a learning curve to working with wood and the knife blade, so I hope this post helps you get the hang of it. Enjoy!
Pin this!