DIY Rock Landscaping Around a Deck
Hey ladies and gents! Our tiny backyard is coming along nicely, and I’m starting to fall in love with it. For last week’s update, we built some raised garden beds. So this is one of those weeks where I don’t feel like there is much visible progress.
We finally discovered the location of not one…but TWO wasp nests in the rafters of our second-story deck. After a targeted assault didn’t do the trick, Mike took everything off of the deck and pretty much doused the entire area in wasp poison.

Extending the rock landscaping around the deck
As I mentioned in last week’s update, we decided the extend the rock landscaping all the way down to the garden bed on the right. The slope in that area of the yard made putting another garden bed there challenging, but I wanted to nix some of the grass.
I also thought it’d be a nice area for some of the full-sun container veggies. So we focused on that. It’s the area where the lawnmower and black pot are below. We followed pretty much the same steps I outlined in my week 2 update.
And we also ended up using the drainage rocks to make the slope a bit more level and then filled the whole area up with river rock. We got it from a local nursery at $6 for a five-gallon bucket. I leveled out a few pavers for bigger potted plants, too. For smaller ones, I’ll just set them down in the gravel.

Adding rocks around the gas meter side
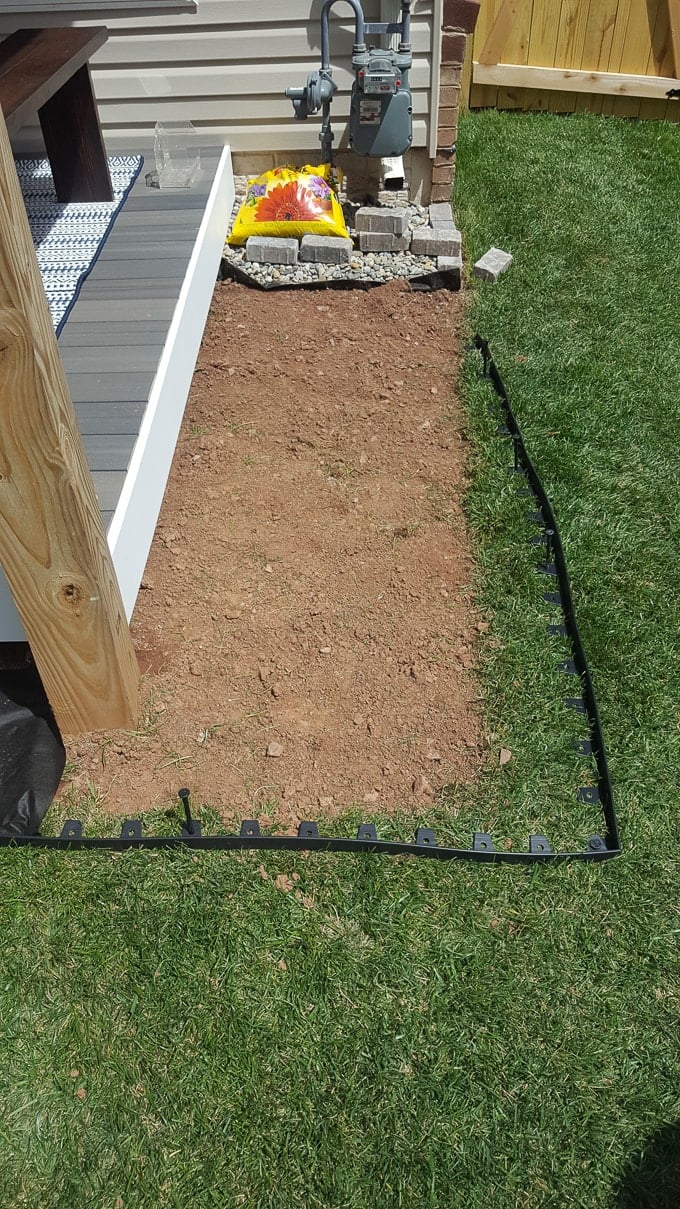
We also worked on the gas meter area, which was a hot mess. Once the deck trim was finished off, I dug that area up, buried that random cut wire because I was too scared to do anything with it, and rocked the whole area to match.
Before pouring down the river rock into the area, I hammered down a simple no-dig black landscaping border (affiliate link). This stuff works so well and creates a really clean edge to hold all of the rock in. Then I added down some landscaping fabric before getting to work dumping the rocks.

And I liked it so much I added more!
So we were done with rock landscaping…until I decided that I liked the clean look of the rocks and pavers so much that I decided to extend it all around the entire deck, connecting the two areas that we had rocked. More work, but I think it was the right move.
This strategy will also help keep the white trim around the deck from getting cut up by the weedwacker accidentally or getting badly stained by grass (it has already showed some grass staining).
I also decided to put three pavers off the area of the deck we want to be the main walkway to step off. More black landscape edging and weed-blocking landscape fabric.
Then, I put some other pavers off the side of the deck by the gas meter where I’ll put some potted plants. Again, we had planned to do another bed here and put in some tall greenery for added privacy, but the slope here would make the garden bed challenging. More rocks it is!
One tip for rock landscaping…have an extra bag (or, in our case, bucket) handy to tweak the levels after your first big rain. Especially if you’re near a gutter. Things will shift a bit as everything settles into place.


Bringing in some more plants
This space was looking really nice, but I was dying to get some greenery in there. You can see bits of the greens in the previous photos. I love, love, love Pot Clips (affiliate link) and have used them for a few projects before (hanging succulent planter, vertical outdoor garden, key rack).
Highly recommend. They are super sturdy and durable, and they help you maximize the sunniest spots in your yard or home by going vertical. I chose to use these for my herbs up along one of the second-story deck footers. Here’s a peek. Herbs are still looking kinda rough this early in the season outdoors.


AND HERE’S A RECAP OF THE TO-DO LIST…
Build a platform deck (not DIY—having a licensed contractor do it to make sure it’s done right)- Add additional lighting—hanging? string?
Clean up area around the AC unit and the gas meter/gutter using rocksBuild table and benches for deck (Done, actually. Just need to finish them off with some no-slip bottoms because the Trex is very slick.)Build screen for AC unit and all of those wires and boxes back there- Hang plants
Build veggie beds and lattice for climbing veggiesHang swing for Ramona- General landscaping around the fence perimeter (flowers, bushes, etc)
- Maybe: Privacy screening for the deck area (depending on the cost, and I don’t think I want to DIY this)
- Major maybe: Let myself do a little shopping for some fun items like a large outdoor vase planter—budget depending
2021 rock landscaping update!
Popping in a few years after originally publishing this to share an update! The rock landscaping around the deck has been a really low-maintenance option for us. The weed-blocking landscape fabric has done a great job of keeping weeds out. And anything that pops through I usually just yank out.
After each winter when we’re cleaning up things in the backyard for the spring, I just inspect the little plastic stakes along the black landscape edging. I take a mallet and pound down any stakes that have come loose over the winter to straighten things up.


After the first winter, we had to go back to the nursery to get another 5-gallon bucket of river rock to fill in some spots that had settled or gotten uneven. The next spring, though, we didn’t have to do this. So I’m thinking that means things had settled into where they wanted to be after a year.
Here is a whole piece about our little backyard in 2019, and then the yard again in 2020. Lots of updated pics so you can see how everything is holding up. I’ll tell you what, though—the rock landscaping around the HVAC unit has probably been the best!
We might not see it behind the DIY HVAC unit screen we built, but it helps to keep things clean and tidy. And no cutting grass back there. One of the best decisions we made in this rock landscaping plan.
Here are a few shots of our little townhouse oasis this year. We’re loving the rock landscaping and wish you luck putting yours in!!


Pin my tips!


Omg, wasps are honestly my worst fear. I am so scared of them and I commend your husband’s bravery in engaging in warfare with them. And impressed you continued work so soon after because I would worry they were waiting to kill me somewhere nearby lol. Your backyard is looking amazing!!
Thank you!! So we got a spray that can spray from up to 20 feet away or something, so he sprayed it down and ran inside each time. Then after he doused the deck, we just stayed out of the backyard for about 24 hours. I’ve only seem a handful this entire week, which is a HUGE improvement!!
Awe, your baby is adorable and that swing is perfect to keep her happy in your yard! Looking great. Good luck with Week 5’s update.
I’m going to have so much fun hanging out with Ramona in the space while I babysit! Great job!!
I love that added rock border, it looks great! And what a cute swing…she looks so happy in it 🙂 I am glad you were able to eliminate the majority of the wasps…they are the worst! Looking forward to next week!!
What a cutie! She looks perfectly content in the new swing. The yard is really coming along- great work!
The rock border looks so good all the way around! That was a great idea! And your little helper is just the cutest.
Your backyard has come such a long way! Wasps are the worst, I don’t blame you for poisoning them all, especially with your little one outside.
The rock border looks great and I have to say that you guys are working sooo hard!
The gravel rock all turned out so good! I literally started laughing out loud at my desk when I read that you buried a wire because you didn’t know what else to do with it. I would definitely do the same!
This is looking so good so far! I love the border of river rocks, that’s a great way to transition from the deck to the grass
It’s all looking so good! And obviously the swing model really makes the space 😉 I love how you mounted those planters, I’m now inspired to do that in our backyard to make the fences look a little more interesting!
oh my gosh! this looks finished! looks like the reveal. great job!
Everything is lookin so great! LOVE that adorable swing. The wasps are terrible at our house too. Hoping once the ORC wraps up we’ll have time to take care of them.
You are a serious DIY queen. The patio is looking great… I love reading about your creative process and different choices. That baby is adorable, too.
Wow it’s looking really good, great progress. Your hanging herbs look great, and the rocks do looks so nice and tidy. Can’t wait to see it all finished.
The rock border looks awesome! (and your daughter is beyond adorable!)
Oh! I love what you did with the rocks! Everything is soooo pretty! We had a wasp nest last year and destroyed our wasp family too. Not fun having wasps with little ones around!
This is looking so good, Brittany! You’re giving me ideas for my backyard.
That unicorn swing and your daughter are so precious!! Love the herb pots and the rocks add so much!
Nice work very relaxing environment. We are trying to figure out what to do around our deck and trees and the river rock looks to be our solution. My concern is the ability of the grass to seed in the rock unless the barrier is big enough to keep clippings from weedeater away. Have you had success with the smaller perimeter?
We have! Sometimes weeds knick up, and I just yank them. It’s pretty easy to stay on top of them.