
Easy DIY Monitor Stand
Learn how to make a DIY monitor stand with my simple tutorial!
Learn how to make an easy DIY monitor stand
Using a monitor stand is a super easy way to free up space on your desk while also giving your work area a sleek look. I don’t have a small desk, but I like to keep my space free of clutter and also liked the idea of storing my laptop under a monitor stand.
Ergonomically speaking, monitor stands are also great because they allow you to adjust your monitor’s height so that your line of sight lines up with the center of your monitor, helping to prevent posture and eye strain.
I could have just purchased a nice adjustable monitor stand, but that wouldn’t be me! I didn’t want something plastic or something that looked like it belonged in a cubicle. But I also didn’t want to spend a lot of money, so I decided to make one out of a piece of pine. Let’s talk about it!

Supplies I used…
(Affiliate links below; read more about those here)
- One piece of 10in x 20in pine
- Stain in English Chestnut
- Minwax semigloss polyurethane
- Tack cloth and 220-grit sandpaper
- Liquid Nails
- Ikea Stubbarp peg legs
And here’s how I made it!
Always take the proper precautions and safety measures before working with any tools or materials. Wear safety equipment and work with a professional to complete projects when necessary. Read my full terms of use and disclosure for more. Happy making and stay safe!
Step 1: Gather and prep supplies
I kicked the project off by picking up a 6-foot piece of pine from home depot. The piece was already 10 inches wide, so I had them cut a 20-inch piece off so that I’d have a 10in x 20in piece to work with. (I stowed the rest in a closet for a future project.)
Always remember that they can help you cut the wood if you don’t have tools at home! Another tip—if you don’t have tools or want to have the leftover wood, buy a piece of “pay by the linear foot” lumber. Some lumber comes in predetermined lengths (4 feet, 8 feet, etc.). But many times you can have them cut only what you need a pay for that.
Even though the wood was unfinished, it still needed a good sanding to clean it up, especially around the edges. I used 220-grit sandpaper all over to give the piece a nice smooth finish, focusing on rounding and softening the edges. My desk has edges that are rounded ever so slightly, so I wanted it to look like that.


Step 2: Stain and finish the DIY monitor stand
After sanding, I wiped the piece down with tack cloth to remove all sanding residue and put one coat of stain on. Stain is optional, but I do recommend finishing/sealing the piece of wood with a urethane. This will make it easy to wipe down and keep clean.
I finished the piece off with three coats of polyurethane. Two coats would have been enough, but I think the third coat really gave it an extra polished look. (I made sure to use 220-grit sandpaper to sand lightly between each coat of poly.)
Again, if you aren’t too handy, you can finish it off with an aerosol urethane instead of brushing it on. I don’t love aerosol urethanes, I just don’t think they provide as pretty of a finish. But in terms of ease and utility, an aerosol will work well. (You can also check out my guide on how to stain and finish wood for a beginner’s tutorial.)

Step 3: Attach the legs
I used four Ikea Stubbarp legs to support my monitor stand. They are a great price at $8.50 for a pair, and they aren’t plastic. Since the Stubbarp legs are made for Ikea furniture, they come with an M8 bolt on each leg.
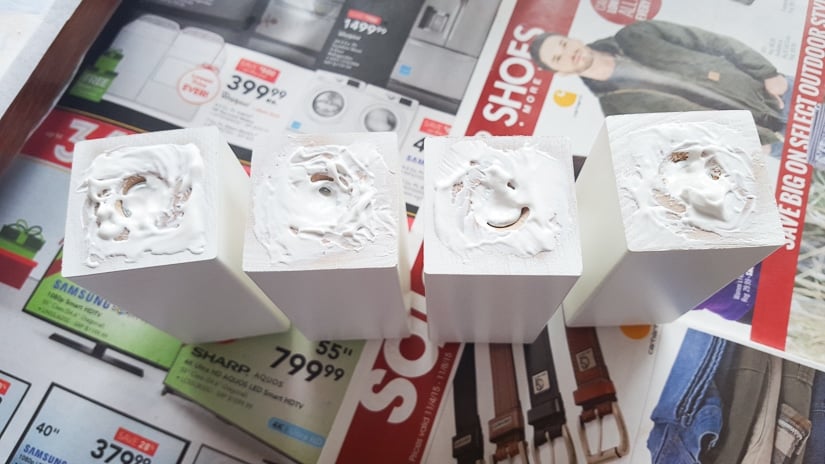
However, since my piece of wood was only 3/4 of an inch thick, the M8 bolt was way too big. Instead of cutting the bolt or finding a smaller bolt, I used Liquid Nails to attach the legs to the wood. See the black indented circles on the bottom of each leg? They are a cool feature that you can twist out a bit if you need to balance slightly unbalanced legs.
If you aren’t near an Ikea, you can just buy a piece of 2″ by 2″ pine and cut it down to size (or have them help you cut it down!). You can leave it unfinished or spray paint it, just as I did with my Cricut stands linked below (scroll down!).


Did my DIY monitor stand last?
I have now been using this monitor stand for 6 years! Have I really been doing this website for that long? And this DIY monitor stand of mine has been with me every step of the way! I am still using it—at this very moment, in fact!
It has held up incredibly well. Through moving houses, moving workspaces, and multiple late nights of me sitting in front of it. I love being able to slide my laptop underneath it when I’m not using it.

I have made one change, though, so I wanted to provide an updated pic. When I made my DIY Cricut machine and printer stand, I decided to match the wood. That just meant replacing the top with a piece of poplar finished with a few coats of matte water-based polyurethane.
It is a great and incredibly durable finish. I have used it on a number of projects, and the longevity is awesome. I then just glued the legs back on and put this bad boy back to work! I hope this inspires you to add a DIY monitor stand to your workspace, too.

Pin my DIY monitor stand!


I’d like to know more about the ergonomics of this setup
I’ll tell you when I get home… #husbandtrolling
good article,, thanks… 🙂
You’re welcome 🙂
Love this! What a terrific idea! Would you share this at our Dishing It & Digging It link party? We are live now and every Sunday at 4pm!
This is great! It would also make a great television monitor stand. Pinning!
Hi Brittany, I love this & would like to have my husband make me one to lift my monitor to a level that’s more ergonomic for me! Thanks for sharing! Well done! Blessings, Janet
Thanks Janet!
I totally agree. Thanks for sharing!
Love it. Thanks for joining the #InspirationSpotlight party. Shared
Hi Brittany, great inspiration. I have a question – how did you remove the bolts from the Stubbarp legs, by cutting the wood or was it easier?
Thanks,
Peter
You could just twist them right out, if I remember correctly! I definitely don’t remember cutting anything.
Think am going to make this for my Toshiba lap top. Having bulging disks in my neck and back any time spent looking at screen causes knots in shoulders and pain in neck,back literally.
Your platform look really sharp, very professional, like stained top. Glad you shared this project.
Have wonderful week.
Hey JaneEllen! Thanks for stopping by, and I’m glad you like the project! Hope it helps with your neck and shoulder pain.