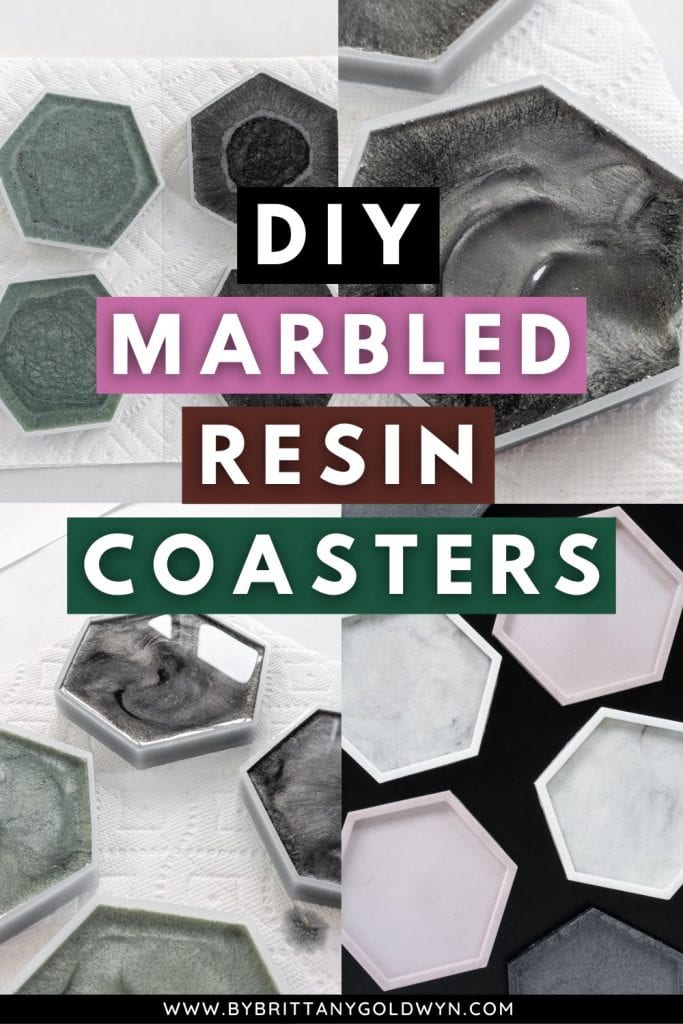
DIY Epoxy Resin Coasters
This post shares my DIY epoxy resin coasters using a hexagon silicone coaster mold, including how to use a heat gun to pop air bubbles in resin, how to add color to epoxy resin and what you should and shouldn’t use for adding color!
DIY Epoxy Resin Coasters

Another epoxy resin project! I’m a mad woman! Okay, I’m just really enjoying working with resin lately. It’s fun to improve on a new skill and try new things. Kind of helps you get out of a rut when you’re feeling creatively challenged, I think.
Today I am sharing DIY epoxy resin coasters using a hexagon silicone coaster mold. I’ll also share a bit about how to use a heat gun to pop air bubbles in resin (much like I did with the tiny resin planters I made) and how to add color to epoxy resin. There are a few ways to do it, and some are better than others.
Okay, so let’s jump in.

For more resin projects, check out my galaxy-inspired resin paint pour art, my tiny resin planters, how to make resin jewelry and this resin and wood serving tray, and the difference between matte and shiny silicone molds!
For more coasters, see my faux marbled clay coasters and my chic concrete coasters.
Supplies
(Affiliate links below; read more about those here)
- Two-part epoxy resin
- Hexagon silicone molds
- Wagner FURNO 500 heat gun
- Mica dye powders
- Black alcohol ink
- Silicone measuring cup
- Disposable mixing cups and stirrers (buy a kit here)
- Disposable gloves
- Workspace protection & paper towels
And here are the DIY Epoxy Resin Coasters steps.
Step 1. Protect workspace and gather materials
The first step is obvious but super important. Make sure you protect your workspace as resin is very messy. The dye powders can easily get on things, too! I use a thick kraft paper and tape to protect my workspace and have paper towels handy.
Wear disposable gloves. Trust me. Cleaning resin or uncured resin off your hands is a huge pain. Plus it’s not exactly what you want on your skin. Also work in a well-ventilated area. If you don’t have a well-ventilated area, make sure to wear a mask.
Because epoxy resin cures so quickly, make sure to have everything prepared before starting. That includes having all of your mixing cups and stirrers out, as well as deciding on what colors you want to use and having them ready.

Step 2. Mix resin and add color
Once you’re ready to go, measure and mix your two-part epoxy resin. You can use a silicone measuring cup, which is really easy to clean out once the resin is fully cured. Another option would be to use disposable cups that you’ve measured and marked.
You don’t want to have more of one of the two parts. It’s important to have equal amounts or the epoxy resin won’t cure properly. Mix thoroughly, adding in dye powders as you mix. A little goes a long way, and remember, you can always add more if the color isn’t strong enough once everything is mixed up.

How to add color to epoxy resin
I have experimented with a few methods for adding color to epoxy resin. The best options to color epoxy resins are tints designed specifically for resin, mica dye powders, and alcohol inks. For this project, I’m using mica dye powders and black alcohol ink.
I love both of these options because they are very highly concentrated and produce fab color. The dye powders I’m using also have a beautiful shimmer to them and are quite opaque if you use enough. The colors are beautiful, and I definitely recommend them.


Here are a few other options you can use successfully, depending on the project:
- Acrylic paint (not oil-based paint)
- Powders like eyeshadow and kitchen spices
- Pulverized sidewalk chalk
- Water color paints
- Glitter
- Nail polish
- Food coloring
Coloring epoxy resin with acrylic paint and glitter
There are two I want to talk about specifically: acrylic paint and glitter. If you use acrylic paint, use as little as possible to color the resin. It introduces more moisture to the resin, which can throw off the ratio needed to properly harden and cure. I used paint in my galaxy-inspired resin art, but this wasn’t very thick and I didn’t add much paint, so it cured fine.
However, when working with molds, adding too much paint can be problematic. It is heavier and can sink to the bottom of the mold instead of mixing in with the resin. This will lead part of your casting to not cure or dry because it is mostly paint mixed in with a bit of resin. No bueno.
As for glitter, this also worked on projects where the resin is thinner. It also works well on resin pours. You can definitely use it in molds, but beware that a lot of it will sink to the bottom of the mold (which, in most cases, is actually the part you see). You can end up with a lot of glitter on one side of the resin casting and hardly any on the other!

Step 3: Pour resin and pop bubbles
Okay, now back to the steps! Once you’ve chosen the material you’ll use to color your resin and thoroughly mixed it in, immediately pour the mixture into your hexagon silicone coaster molds. You don’t need to grease the mold or anything.
After about a minute, air bubbles will begin rising to the surface of the area you poured. You can easily and safely pop these bubbles with a heat gun. Others use hair dryers, which I’ve used in the past, but this is a much better option because it has multiple different heat settings and a weaker fan. Continue directing your heat gun at the resin for 30–60 seconds.
(A hair dryer can blow your resin everything, even on the lowest setting. If you’re spreading colored resin around a large surface to create patterns, this can be a great option. But if you’re working with a smaller project or a mold, this can suck.)


Step 4: Let the resin cure and pop the coasters out
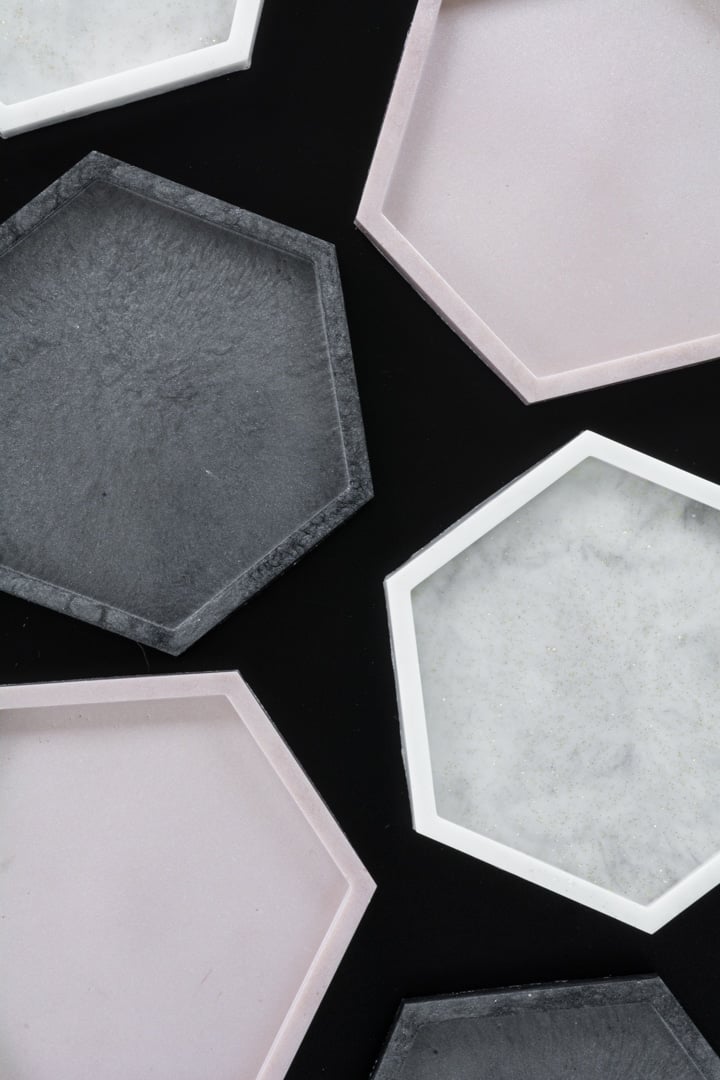
After the resin has cured completed according to your resin’s instructions, pop it out of the mold and enjoy! Here are a few of the pretty coasters I made using a mix of the dye powders, alcohol inks, and some fine glitter.


Share my DIY epoxy resin coasters using a hexagon silicone coaster mold!