Jade Satin Scindapsus Propagation
Learn all about jade satin scindapsus propagation! Jade satin scindapsus is a gorgeous variety that is a slow grower but isn’t too difficult to root. Learn how I started a new plant from a single dying leaf.
Usually I don’t write a propagation post before I write a care post…but this is an exception! That’s because jade satin scindapsus is so hard to find and expensive that I could only get my hands on a single dying leaf with a node.
And you know what that means! I dove head first into learning all about jade stain scindapsus propagation. In fact, this post has been a little over a year in the making. Spoiler alert: she’s not a fast-growing plant. 🙂
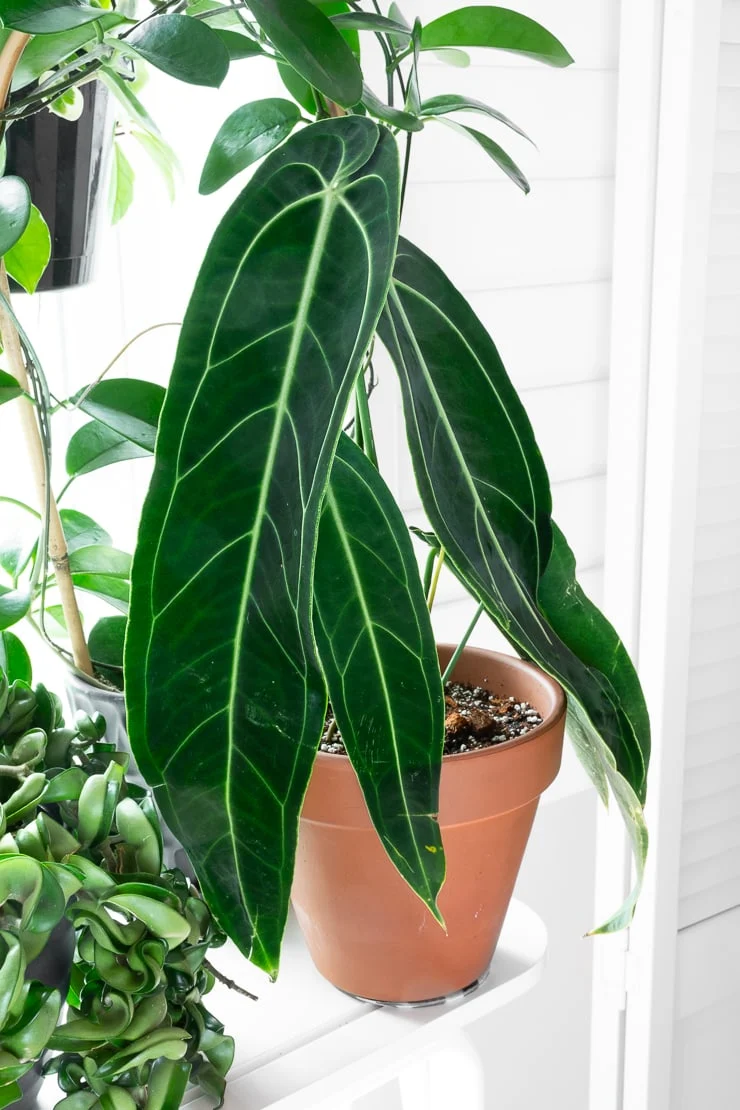
What is jade satin scindapsus?
Ugh. It’s a beauty. It is closely related to the much more common scindapsus pictus and scindapsus treubii moonlight. (I also have a post about how to root treubii moonlight and treubii dark form cuttings if you’re interested!)
But unlike many of its scindapsus relatives, the rare jade satin scindapsus isn’t silver. Instead, its large, thick, slightly textured leaves are a gorgeous shade of jade green. Jade satin is like its relatives in other ways, though—it is a vining plant with strong stems that can easily be trained to climb.


Let’s talk a bit about care first…
I do want to cover a few high-level jade satin scindapsus care details because they will help you when you’re propagating this plant. Jade satin enjoys bright indirect light and will even tolerate medium light levels. Too much direct sun will burn its leaves.
I have my little jade scindapsus out on the patio for the summer (under the shade of a big banana plant leaf) so it can soak up all of our oppressive Maryland humidity. Add speaking of humidity—these plants love it! However, they will tolerate normal household levels.
Scindapsus plants in general enjoy a thoroughly well-draining houseplant soil. I’ve been buying a lightweight houseplant mix for my scindapsus plants and adding a bit of extra perlite in. Water thoroughly, letting water flow freely through the soil and out the drainage holes.
Wait until the soil dries out completely before watering again. Jade satin is very prone to throwing a fit if you overwater it, so having a light hand with the watering can is essential.


Jade satin scindapsus: Climbing, vining, or trailing?
My little baby is still way too small to climb, vine, or trail…but I can dream, right? 🙂 Jade scindapsus, much like its other scindapsus relatives, can climb, vine, and trail. I have most of my scindapsus varieties in hanging baskets.
However, scindapsus plants can tend to get a bit leggy in hanging baskets, shooting out “runner” stems with no leaves that don’t look as pretty. This is because the plant is looking for something to climb.
Pruning these off means you can give them away to others to propagate. I have done this a bunch with my scindapsus pictus exotica plants. As a bonus, pruning the leggy stems means you will encourage bushier new growth, leading to a fuller plant.
If you have your plant on some sort of trellis or other climbing apparatus, you will likely be able to avoid these runners. I don’t have any of my scindapsus climbing right now, but I’m considering trying it out soon with an exotica!
Now back to jade satin scindapsus propagation…
Alright, now that we’ve covered some of the jade satin basics, let’s talk propagation and rooting. As I mentioned, I do not have enough spare cash lying around to buy a full pot of jade satin scindapsus.
If I could even find one! It’s so hard to find one…generally it’s just smaller plants or unrooted cuttings. I have seen a few large pots, but they sell out so quickly. Unless you import them yourself, it’s tough.
So I was trading a few cuttings with a new plant friend last year and she offered me a crispy jade satin leaf that was on its way out…but it had a node! There were no roots yet, but I was ready to try my hand at rooting this one.

So here’s how I did it.
First I filled up a plastic cup with damp sphagnum moss and perlite. I dipped the tip of the stem and node into rooting hormone powder and put it down in the moss and perlite mix. (For more on this topic, check out my post about how to root plants in sphagnum moss.)
To ensure the mixture didn’t dry out and the humidity stayed high, I put a plastic bag over the cutting and cup. And then? Then I waited. I set the cup on my plant shelving near a light source and tried to check it only every few weeks.
Yes! Weeks 🙁 You have to have a lot of patience with this one. Finally, after a few months, I noticed roots emerging. This is what I was waiting for! Strong healthy new roots. I also noticed the very beginnings of a new leaf.
It was around this time that I started using a small plastic propagation box for some of my plant propagations. It’s a convenient way to contain the mess, hide the plants from the cats, and keep humidity levels sky high.
I decided to move the jade satin scindapsus cutting in there to hopefully jump start the growth. The roots had about doubled in size, and I was beginning to see the new leaf emerge.
I mixed some worm castings into the moss for nutrients as well. And since a new leaf was well on its way, I cut the original crispy leaf in half so the plant would focus its energy on healthy new growth. And then? Then I waited again 🙂


A few months later…
I checked the plant every few weeks when I checked my other propagations. Once a few more months had passed, the new leaf had completely opened and was a very light green. I wondered if it would stay this way—it wasn’t very cute.
However, after a week or so had passed, the new leaf had darkened to the gorgeous jade green color I was expecting. With a brand new healthy leaf and another already on the way, I decided it was time to cut the rest of the old leaf off completely and put this bad boy in soil!
And that’s where we’re at now. The root system is really well developed, and I’m eagerly awaiting leaf #1! This plant is really testing my patience, but it’s also incredibly rewarding to have saved this cutting from my very generous friend 🙂


Caring for my jade satin scindapsus propagation
I mentioned I have this little love outside for the summer. My goal is to hopefully have the humidity help jumpstart some more growth! We’ll see how that goes. It’s on a covered patio, so it is mostly watered by me.
I need to water it more frequently than I would outside because it has been ungodly hot here lately. Just remember, wherever you have your plant, let the soil dry out before watering it again. Inside that could be every 10 days, outside that could be every other day!
In mid-September, I’ll bring this plant inside for the fall and winter. They are not frost hardy and will definitely die if kept outside in my area. The growth will also slow down even more, meaning you can ease up on watering too.
I’ll update this post with how my plant is doing in the future. Good luck with your jade scindapsus propagation!


Great timing on this post, I was just staring at my two jade satin leaf nodes and wondering why they’re not doing anything although it’s been three weeks! I guess I’m going to have to be a lot lot lot more patient. So I’m a little scared to try my cloneX gel on it as I feel like I have rotted some leaves using that stuff. Do you have a strong preference for the powder? I don’t have that type yet. Also do you really dip the whole thing up to the node or should I just smear it around the node area? I was reading some advice it said to dip the end of the clipping in wax so it won’t rot, but if you dip the end in wax it seems like it couldn’t take water up from there and that would be bad?! So many questions ? I too don’t want to lose my spendy leaves!
I totally get it!! I haven’t used the cloneX gel. I think I just have the bonide rooting hormone. I think it’d be fine to let the cutting heal over for a day or so before dipping it in something for rooting! I just pour a little powder into the cap and then roll the cutting around in it, making sure to cover the node. I feel like using a perlite-heavy sphag mix also helps with aeration and preventing rot! My biggest recommendation would be patience. I know, it sucks 🙂