
How to Cover Drainage Holes in Pots
This article shares how to cover drainage holes in pots, including three different methods to do it! This content contains affiliate links.
How to cover drainage holes in pots
I recently bought a few cute pots that had drainage holes in the bottom of them but didn’t come with saucers. You could buy little plastic saucers, but sometimes it ruins the look of a pot if you’re shooting for a specific aesthetic.
And I know you’re probably thinking…you’ve told us in the past that planting in pots with drainage holes is the best option! So why would you want to seal the holes? Well…you might want to set a plastic nursery pot with drainage holes down into a pretty ceramic pot.
I love watering the plants I have in plastic nursery pots in the sink. That way I can soak the soil and make sure all of the extra water drains out of the holes. Then, I can set them back into their pots without drainage holes and not have any water drips get on the floor.
Sometimes I also like bottom watering plants in pots. And you can’t have any drianage holes in your decorative pot for that.
So I’m going to talk about three different ways to cover a drainage hole in a pot—one is to completely seal it, the other is to simply add a “screen” that will prevent the dirt from coming out, and one is removable. So let’s do it!

Method #1 to cover drainage holes
First let’s talk about the first method for covering drainage holes in pots. This is the less permanent of the two methods and still requires a drainage saucer or something similar. It’s best used for plants that you’re able to take to a central place and water, letting the water flow freely and into a sink or tub and then putting the plant back where it belongs.
Supplies
- Pot with a drainage hole
- Coffee filter, or for a strong option that still allows water to flow freely, try landscaping fabric or tulle
1. Cut a piece to be the filter
Generally when I do this, I use a coffee filter. That’s because I have a bunch of them in the kitchen at all times, and I’m usually potting right beside the kitchen. If it’s a large pot, I’ll throw the entire coffee filter in the bottom of the pot. If it’s a smaller pot, I’ll just rip a piece off and put it on the drainage hole.
2. Fill with soil and plant
The filter will block the dirt from coming out of the drainage hole. Add a layer of dirt on top of the coffee filter and then add your plant. Fill in around the plant. Now when you water the plant, it will drain a bit slower, but it will still drain. If your planter doesn’t have a drainage saucer, just let it drain in the sink.
You can also keep the plant on a cork pad or coaster of some sort to make sure condensation doesn’t get out onto whatever surface the plant is on. I do this for a lot of the cute little planters I have that either don’t have or don’t look good with drainage saucers. You can buy cork pads at any big box hardware store or local nursery.

Things to keep in mind about this method
If you’re using coffee filters, they will eventually break down over time. By that point, the soil will likely be settled and slightly more packed in, meaning it won’t come out of the drainage hole. So breaking down might not have much of a noticeable affect.
If you want something a bit stronger, you can use a piece of landscaping fabric. Since you have to buy landscaping fabric in bulk, though, you might not want to buy a whole giant roll just for this. In that case, I recommend heading to a fabric store and picking out a piece of tulle or netting fabric from the clearance or remnant area. You could even find and old piece of sheet clothing or cloth in your house and use a piece of that.

Method #2 to cover drainage holes
Method #1, the filter method, works really well in most circumstances. However, there might be circumstances where you want to seal a drainage hole completely as I discussed earlier in this article.
Supplies
- Pot with a drainage hole
- Concrete mix, the kind you just add water—or clay
- Disposable bowl and spoon if you use concrete
- The price sticker the pot came with or aluminum foil
1. Grab a sticker or foil
If your pot is new and came with a price tag on the bottom, use it to cover the hole. This will give you the cleanest result. If you don’t have the price tag, just set the pot down on aluminum foil or something else that it’s porous.
So, for example, a paper towel wouldn’t be a good idea, nor would a piece of paper. But wax or parchment paper might be fine. Don’t overthink it. Just grab something.

2. Mix concrete
Mix up just a bit of concrete in a disposable bowl. I used Cement All, which is super easy to use. You can probably pick some up at your local Home Depot or Lowe’s. Even the smallest box is kind of heavy, but it has a neat little handle on it.
Just add one part water for every four parts powder you use. (Detailed instructions are on the box!) Once completely mixed, the consistency should be like wet sand. It will start drying quickly, though, so don’t mix until you’re ready to pour.


3. Pour and plug
If you’re using concrete, pour down into the bottom of the pot immediately and let dry. You could pour enough just to seal the drainage hole, or you could do a layer on the entire bottom of the pot. That’s what I did just because it seemed like the safest bet and I already have enough concrete mixed up.
When it’s dry to the touch, you can peel off the sticker or whatever you used. See how neat the sticker kept it? And that’s it. A permanent option to seal the drainage hole in your pot.


An alternative to concrete
If you don’t want to deal with the mess of concrete, you can pick up some clay that you can use to push down into the drainage hole from the inside of the pot. This will allow the clay to take on the exactly form of the hole and plug it. Depending on the type of clay, you’ll then just let the clay air dry or you’ll have to bake it.
I also like clay as an alternative to using concrete because it is less permanent and less messy. It’s also easy to go to the craft store and buy one little tiny package of clay, thus decreasing the amount of waste. And you don’t have to store a big box of concrete if you’re not going to use it for other projects!

Method #3 to cover drainage holes
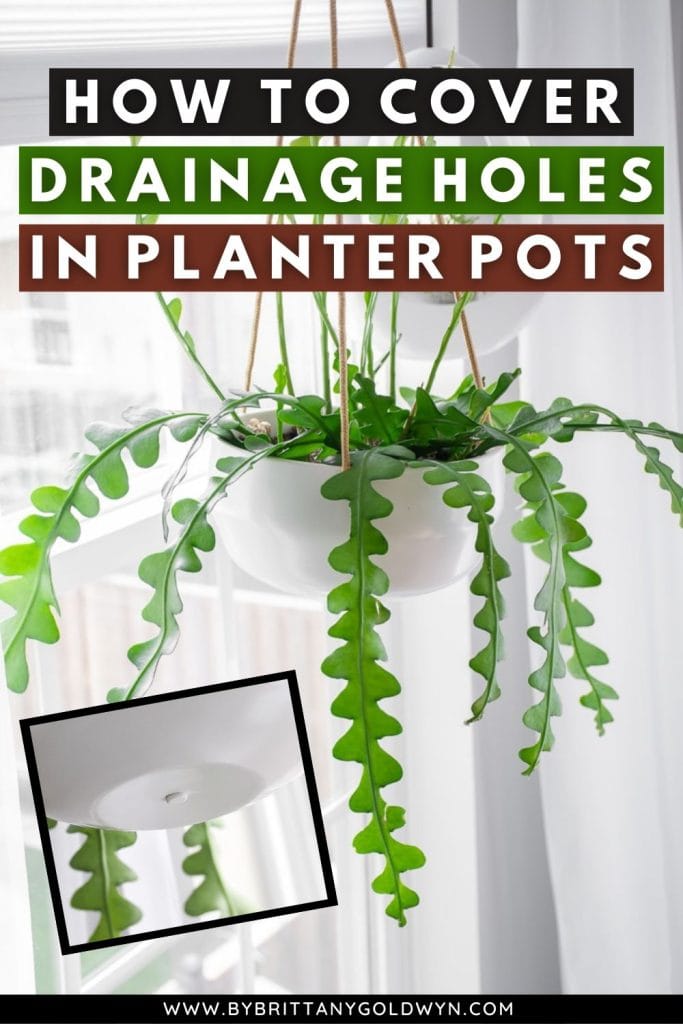
This one is almost too easy…method #3 to cover drainage holes in pots is to buy plugs! Some planters even come with plugs, like the one below that I got on Amazon.
These are great because I can take the plant to the sink, unplug it, water and let all of the excess water drain out the hole, and then re-plug and hang! This way no rogue drops come out onto your floors or tables. Any drops that would come out that are trapped inside wouldn’t be enough to hurt the plant.
One downside to this method is that it’s usually hard to find a pack of just a handful of plugs, and you might not want to buy a 50-pack if you only need a handful. A second downside is that you might not be able to find the size you need to get a tight-enough seal. Something like this set is probably your best bet—it has different sizes!

Wrapping up…
Hopefully this guide helped you all come up with a solution for how to cover drainage holes in your pots—do you have another method? Let me know, I’m all ears!
If you like this, you might like my tips about how to care for pothos plants!
Pin my tutorial for how to cover drainage holes in pots!


will this work on plastic pots?