
How to Make Gorgeous Oversized Wall Art
This post shares a step-by-step tutorial for my DIY oversized wall art. Do you have a huge empty wall you’re looking to fill and you don’t want to spend a lot? This easy DIY large wall art will inspire you—and you can customize it however you’d like. Enjoy!
How to Make Gorgeous Oversized Wall Art for Under $100
The living room progress continues…slowly but surely!
I shared a peek at this project a few weeks ago on my FB page and am so excited to share the whole tutorial today! This is my massive DIY faux canvas art using a tapestry 🙂
(This post contains affiliate links. You can read more about that here. Thank you!)
I shared my plans for this project a few months ago in this post about shower curtains that could be art. I found this peacock high wheel bicycle curtain from an Etsy shop called My Silli Poni and knew I needed it almost immediately! After chatting with the shop owner, I realized she was able to print it in a tapestry for me, which I thought might be easier for this project.
So here’s what I used:
(Affiliate links below; read more about those here)
- Peacock high wheel bicycle tapestr
- Clean canvas drop cloth
- Drill and screws
- Hand-held staple gun
- 1″ x 2″ lumber (actual: 0.75″ x 1.5″)
Here’s the cut list for the lumber: (This isn’t exactly how I cut mine because I made a mistake, but trust me, this cut list is easier!)
- (3) 52.5″ pieces
- (2) 74″ pieces
And here are the steps for my DIY Oversized wall art!
(Remember to wear a mask and eye protection while sanding and working with wood. Do not use any tools without proper training, precautions, and supervision from a professional. Read my full terms of use here.)
Step 1: Assemble the art’s frame.
I used a drill to assemble the frame so that it looked like a giant box. I just drilled directly through the sides or top of each corner since the fabric would be covering the entire frame.
Using the cut list measurements, you’ll want to put the long pieces on the top and bottom with the shorter pieces between them. You can see below that I did this the opposite way…by putting the shorter pieces on the outside of the longer pieces. This works too, but it meant that my center support measurement was off, so I had to re-cut that piece. don’t do what I did. 🙂
Once you have your big rectangle frame, attach the center support piece in place by drilling screws directly down through the top and bottom of the frame.


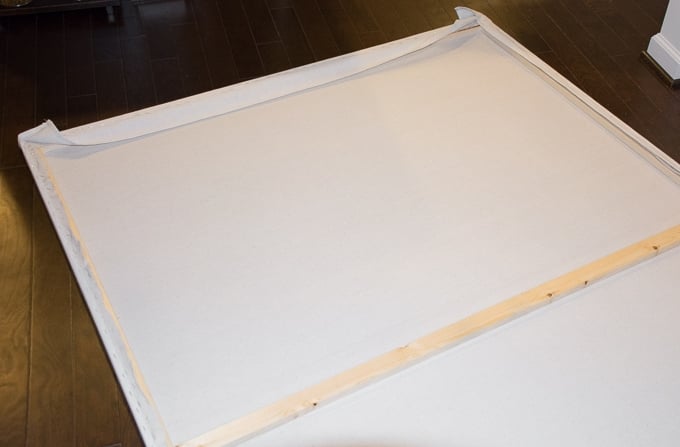
Step 2: Attach the canvas drop cloth liner.
This step helps camoflauge the frame and was necessary for me to do because my tapestry fabric was so thin. A drop cloth is the perfect solution for a liner since they are usually pretty massive.
To attach the liner, cut it roughly to size and begin stapling it in place along the top of the frame. Then, pull it tight and staple in place along the bottom of the frame.
Once it’s in place along the top and bottom, pull it tight along the sides of the frame and staple in place. The goal is to eliminate all folds, wrinkles, and loose spots. Trim the excess fabric when you’re done stapling.


Step 3: Attach the tapestry.
Since this is an iron-able fabric, I ironed out all wrinkles first. Then I laid it out over the frame to ensure I’d have the right placement, flipped the entire frame up, and started stapling the tapestry on along the top of the frame. Just like I did with the liner. Easy!


Top and bottom stapled, now it’s time for the sides. See how the drop cloth liner helps to get a nice, clean surface for the tapestry?
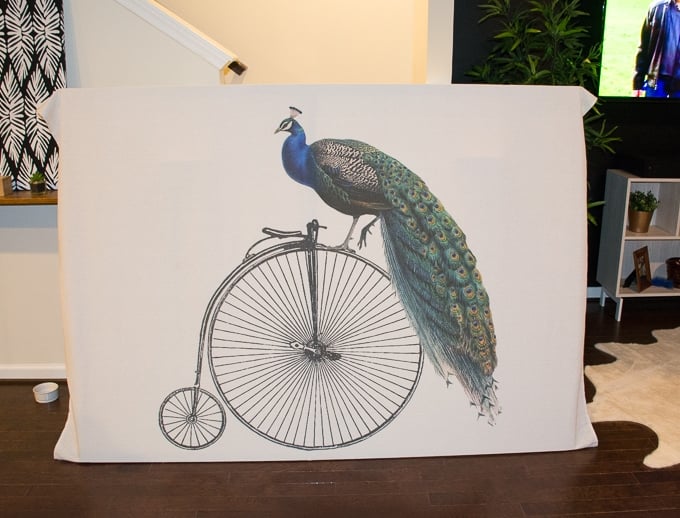
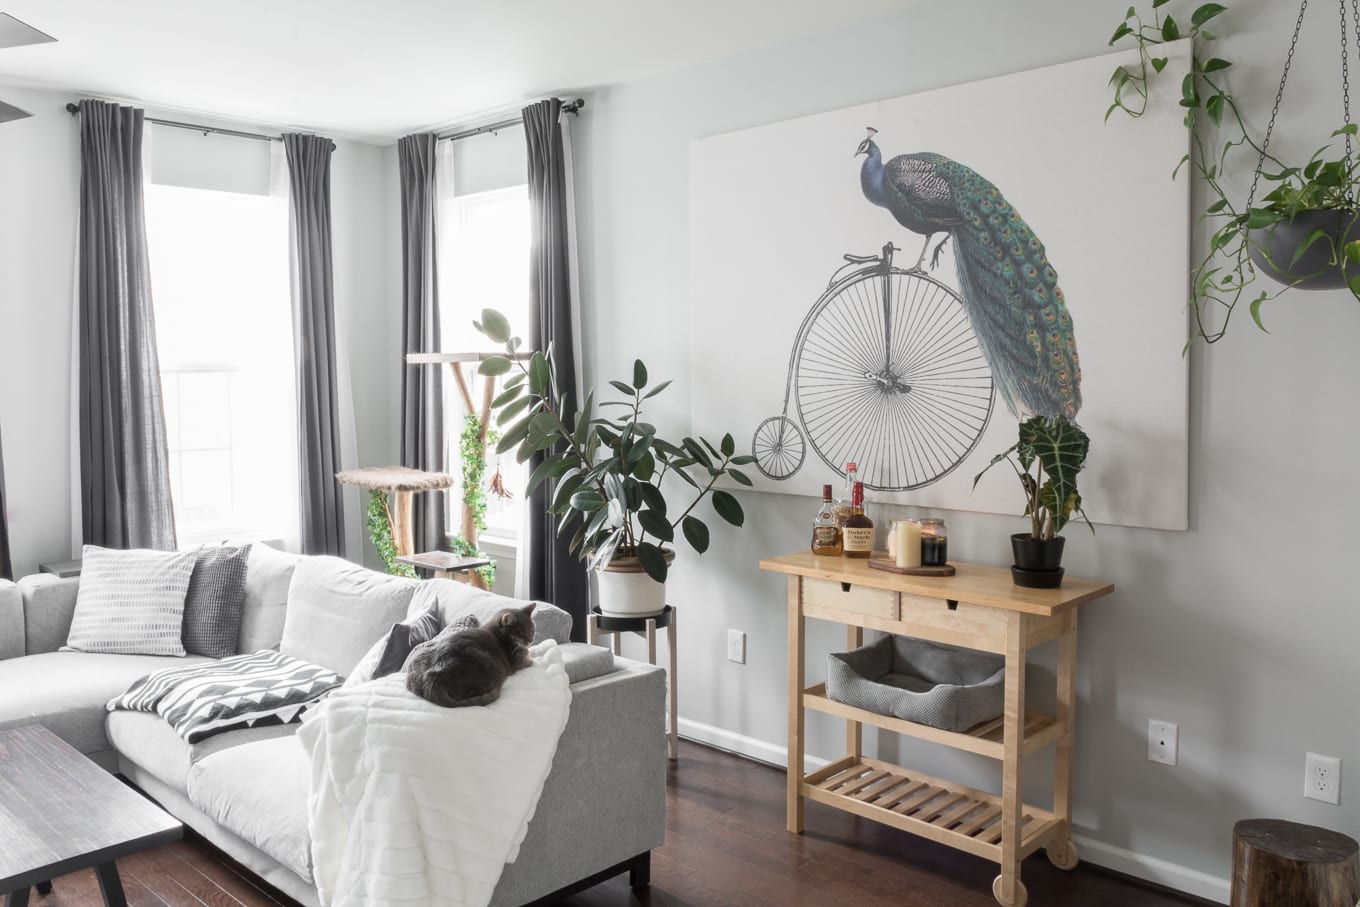
And here is the finished piece. AHHHH!!

Step 4: Hang that DIY oversized wall art stat!
Having a help is a good idea…it would have been difficult for me to get the placement right on a piece this big without someone to hold it up for me. Thanks Mike 🙂
We drove two screws into studs and just hung the top of the frame on the screws. This is an incredibly lightweight piece, so even though it’s massive, it doesn’t need much support.
What do you think? I absolutely LOVE it and think it’s the perfect solution for the space. Plus, I did it all for under $100! Can you imagine how much a piece of a similar size (6+ feet by 4.5 feet) would cost in a store?
(You’ll also note Henry checking it out and freaking out because he’s so excited at how good it looks—third picture.)


Share my DIY Oversized Wall Art on Pinterest!


This is brilliant and it looks amazing in your living room!
Thank you! Making slow but sure progress getting everything together in the living room!
This is one of my favorite things you have done!!
Thank you <3 <3 I'll make one for you some day!
Love this! You are an inspiration:)
Awww thank you, love ya!
It’s so amazing!!
Thanks lady! I love it too 🙂
Absolutely Outstanding. Where in the world did you find such large
fabric to work with?
Hey Allor! Thank you! I used a drop cloth for the liner–perfect solution given their size. Then I used a tapestry I ordered off of Etsy. There’s a link in the post. It was originally a fabric shower curtain but the artist was also able to print it on a light beige tapestry for me. I feel like you can find everything on Etsy. 🙂
Love it! So creative! And I love your cat yawning or meowing in one of the photos!
Yawning…my photoshoots bore him 😉 and thank you!
What a beautiful image you chose! So unique and such a wonderful way to fill space on a large wall. Lovin’ it!
Thanks Angie!!
I love this so much, Brittany. So funny, but I just posted a very similar tutorial….promise I am not a copy cat. haha Fabulous as always!
Much Love,
Erica
I just checked yours out…it’s BEAUTIFUL!!! Great print–I looked at the original on Amazon and it looks so much better in your images on the frame!
You are a genius! LOVE it!
What a fun piece of art! It grabs your attention! Thanks for sharing it with us at the Funtastic Friday linky party!
I love everything about this, I am looking at shower curtains right now! I have a big blank wall in our bedroom after I moved some furniture around, and it needs giant art. Thanks!
It was such an awesome solution and so easy! I want to do it again upstairs.
Wow, I do love this! I’d love to tackle one of these someday soon. It looks so chic.
Love the peacock! So fun!
I have wanted a piece of art similar to this for years but couldn’t afford it, or even find one this nice…WOW!
You both did a fantastic job.
It’s one of my all-time favorite projects, I was just telling my husband that this morning!!
What size tapestry did you order?
I did a 60×80 horizontal print 🙂
Thank you so much. It looks fantastic. You are so creative. I believe I’ll try it. You are an inspiration.