DIY Fireplace Mantel Shelf
Learn how to make a DIY fireplace mantel shelf for an easy fireplace facelift!
I recently shared a post about How to Paint a Stone Fireplace. We moved into a new house that has a fireplace, which I love. But the surround was a mix of a gray stone veneer and gray painted brick…and I hated both!
The fireplace was so heavy and mismatched, so I decided to paint it. Instead of white, I chose black. I am so happy with how it turned out, but painting it meant that I also needed to replace the mantel shelf. So this tutorial is about how I built a DIY fireplace mantel shelf!

Here’s what I used:
(Affiliate links below; read more about those here)
- Pine
- Miter saw
- Drill
- Pocket hole jig
- Pocket hole screws
- Wood screws (I used 1 1/4″ and 2″)
- Wood clamps
- Orbital sander
- Assorted sandpaper
- Minwax stain
- Water-based polycrylic in matte
And here’s how I made my DIY fireplace mantel shelf!
Always take the proper precautions and safety measures before working with any tools or materials. Wear safety equipment and work with a professional to complete projects when necessary. Read my full terms of use and disclosure for more. Happy making and stay safe!
Step 1: Measure, cut, & drill pocket holes
The first thing I did was remove the previous mantel and measure the space so I knew how much wood I’d need to buy. We ended up keeping the little blocks that were already there to attach the previous mantel to.
I was constrained on the size of the mantel since the previous owners added the stone veneer around the mantel. Therefore, I went with the following measurements:
- 77″ long
- 5 1/2″ tall (from a 1×6 piece, which has an actual measurement of 5 1/2″)
- 4 1/4″ deep (from the 1×4 piece, which has an actual measurement of 3 1/2″ plus the width of the front board, which is 3/4″)
Here’s the wood I bought:
- (1) 1″ x 6″ x 96″—the front piece
- (2) 1″ x 4″ x 96″—the top, bottom, and size pieces
To save money, I got select pine—the good stuff—for the piece that would be facing outward. Then I got the regular knotty pine for the top and bottom pieces. There is no back piece—the mantel is hollow.
I took the two end cap pieces from the knotty pine scraps and get them down to size after I’d attached the top, bottom, and front pieces of the mantel shelf.
I used pocket holes to attach the top and bottom pieces to the back of the front-facing piece. This ensured that they would be hidden inside the hollow mantel shelf and give a really sleek, screw-free look on the front of the mantel, top, and bottom of the mantel.

Step 2: Attach top & bottom mantel shelf pieces to the front piece
Then I used a pocket hole bit and pocket hole screws to attach the top and bottom pieces to the front-facing piece using the holes I drilled in step 3. This was a bit tricky because the cheaper knotty pine was a bit warped.
I had to force it in place in a few spots using bar clamps and brute force. But it did work out very well! Here’s what the piece looked like once I’d attached the top piece. I just repeated this for the bottom piece.


Step 3: Attach the end caps
Attaching the end caps was a bit trickier. I was really cursing myself for getting the cheaper wood because of how warped it was. I ended up needing to use a rubber mallet to bang my end cap pieces into place!
In some areas, I needed to use clamps. You can see that below. I was a bit worried for a while that it would look janky when I was finished. But after getting everything in place horizontally and vertically, I drop a few regular 1 1/4″ wood screws through the sides to hole everything in place.
I didn’t use glue as well, but you can if you want to. Mine held great! I did end up using 3 screws on one of the super warped sized. Make sure to pre-drill holes with a small bit to avoid splitting the wood this close to the edges!
I’d been dry-fitting the mantel as I went to ensure everything was lining up. After attaching the end caps, I did one last dry fit on the mantel area to make sure it fit before staining and finishing it.


Step 4: Stain & finish the mantel shelf
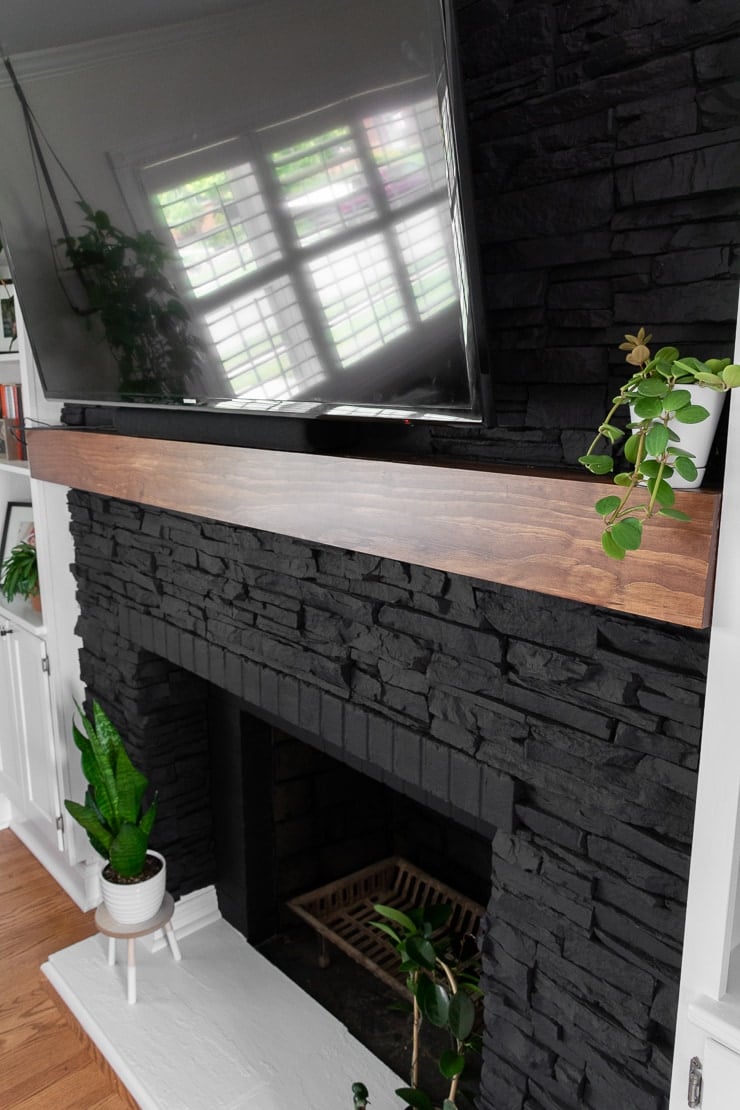
You can see in the previous pictures and the one below that the finish on the front is beautiful! No knots and really lovely. The top and bottom have knots, which you can’t really see when the shelf is mounted.
First I sanded the shelf to break down the rough edges and smooth over the front especially. After sanding, I chose an oil-based Minwax wood stain in English Chestnut to try to complement our 1960s floors. It turned out lovely!
I later used the same color when refinishing a thrifted little dining table. Once I’d stained the piece, I put two coats of Minwax water-based polycrylic in matte on it.


Step 5: Mount the new mantel shelf
And finally, it was time to mount the shelf! This was unexpectedly the most difficult and messiest part. As it turns out, there were a few areas where the stone was just a HAIR wider than I’d measured, which prevented the mantel from sitting totally flush.
Mike grabbed and Dremel to sand down these areas. We also just used a small chisel and hammer to knock the veneer off—it came off really easily.
As I mentioned earlier, the previous mantel had been nailed up on these white blocks that the previous owner has used. Instead of removing these, we just ran with it. I attached a 4′ piece of 2×4 and screwed it into these pieces.
The placement of this needed to be pretty exact since we needed the hollow mantel shelf to fit over it snugly between the top and bottom lines of stone. So we did have to measure, mark, and mount the 2×4 a few times 🙂


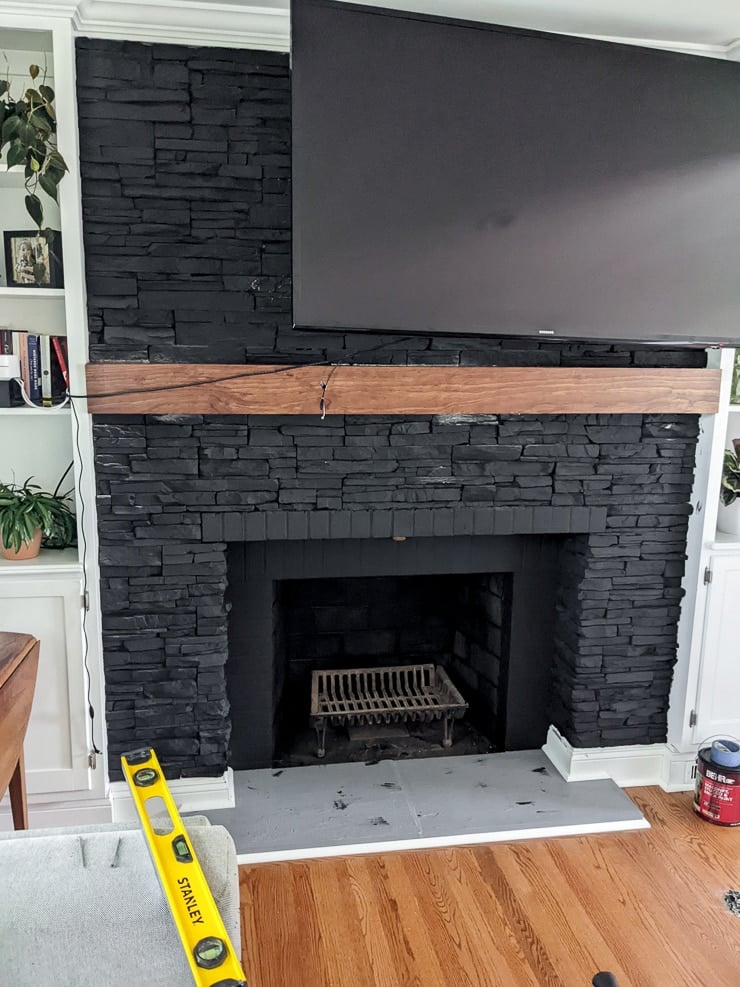
After getting the mantle shelf snugly over the 2×4, we drove a few 2″ wood screws down through the top of the mantel shelf into the 2×4 to hold it in place.
Honestly, it was pretty tight on the 2×4, and I knew it wouldn’t be holding a ton of weight. But the screws help with that. You can see a pic below showing the screws, and then the finished DIY fireplace mantel shelf!
The new mantel combined with the black paint is a total GAME CHANGER in terms of the look and feel! I love it love it love it. The mantel is the perfect size to hold the speaker we have for the TV, so it is as functional as it is pretty!